Workspace Settings
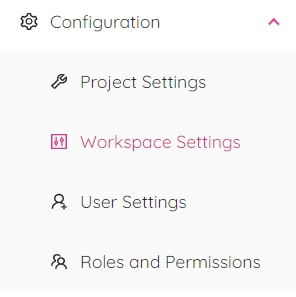
The Workspace Settings module can be accessed through the Configuration menu, located on the left side panel of the application.
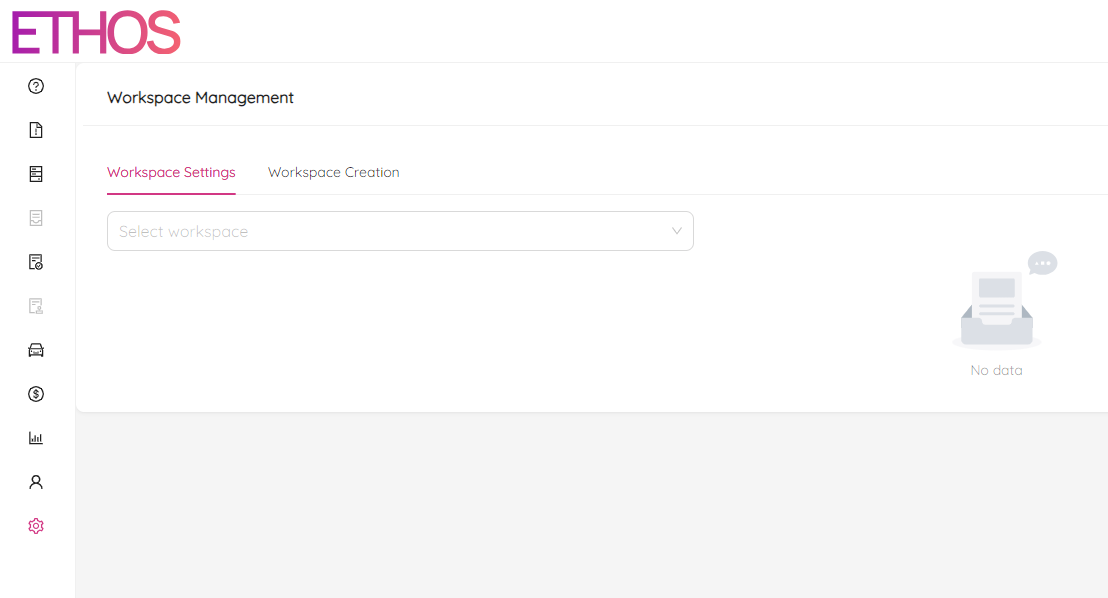
To access the module, you must first select the workspace you want to configure from the drop-down menu. Once you have selected the desired workspace, you can then access seven tabs that allow to configure various settings related to the workspace. These tabs include:
- Information
- Users
- Workspace Locations
- Organizations
- Workspace Collaboration
- Workspace Permissions
- Workspace Notifications
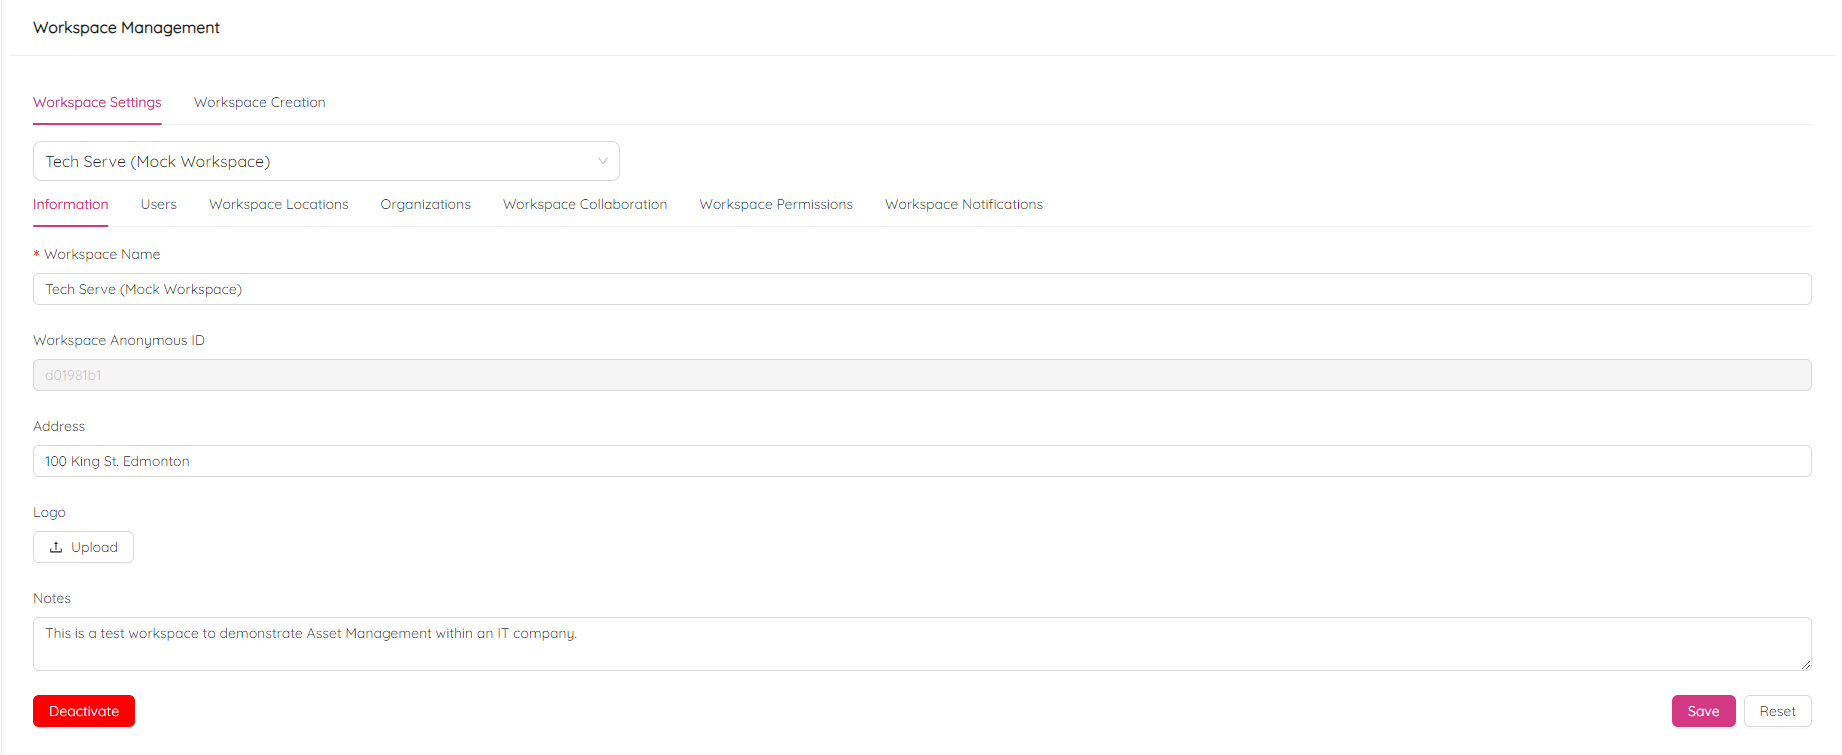
Information
The Information tab allows to view and edit general information about the workspace, such as the workspace name, address, logo and notes. Also, from here you can deactivate the workspace using the red button located at the bottom of the tab.
Users
The Users tab allows managing the users associated with the workspace, including creating, inviting, and deactivating. It contains two subtabs, Manage and Quick Create.
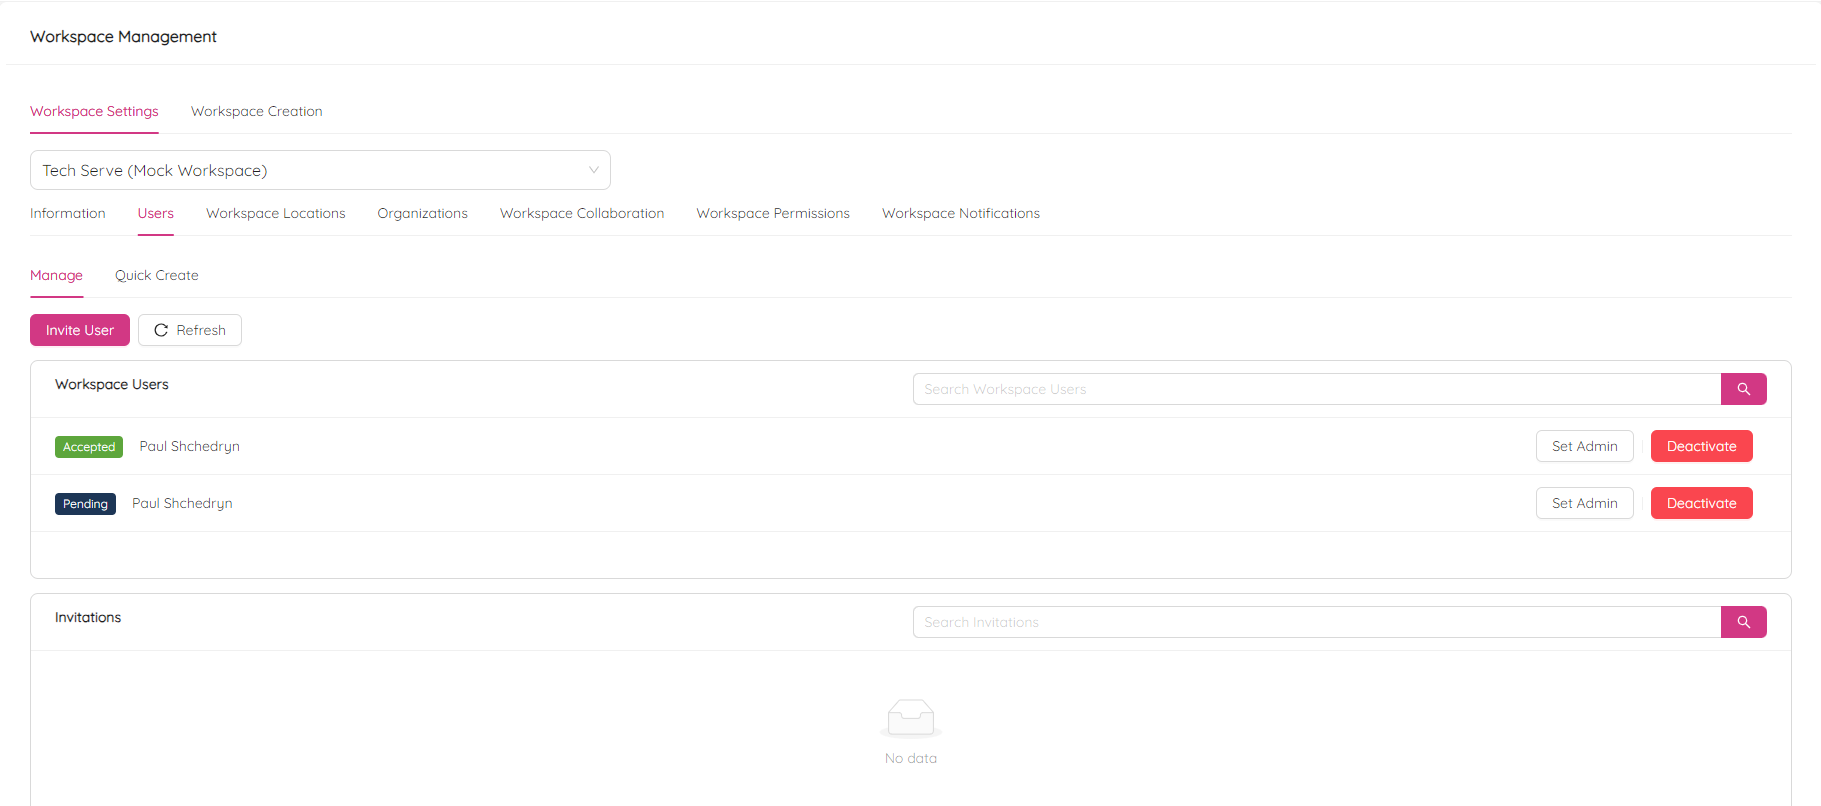
Manage
The Manage subtab allows inviting users to the workspace by clicking on the Invite User button and entering the user's email address. The invitation will be sent, and the user must accept it to gain access to the workspace. At this step, the user will be able to create a new account if it hasn't been created before.
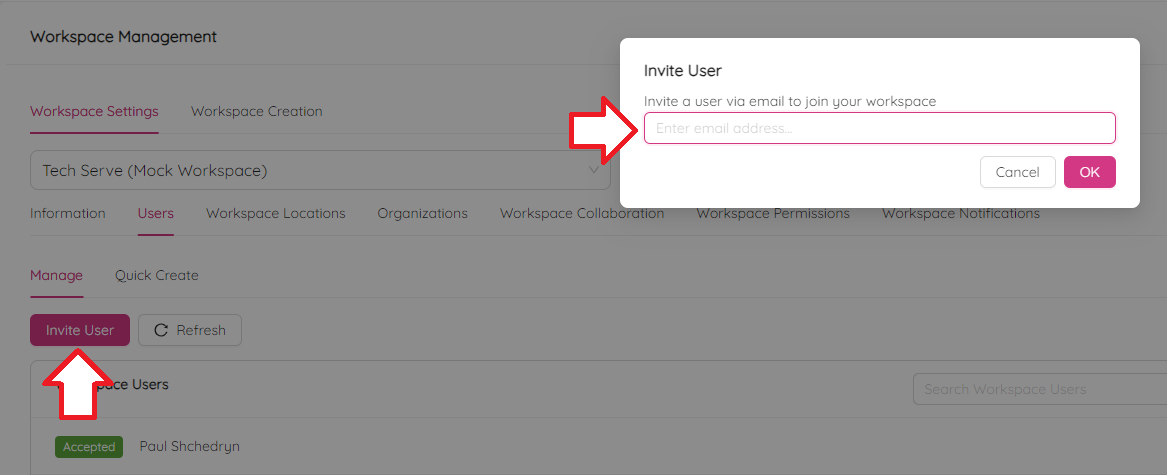
A list of workspace users and their invitation statuses can be found below the Invite User button, allowing users to manage and monitor the status of workspace invitations. The Search Workspace Users panel can be used to quickly locate specific users in the list, and the Set Admin and Activate/Deactivate buttons can be used to assign administrative privileges or enable/disable user access.

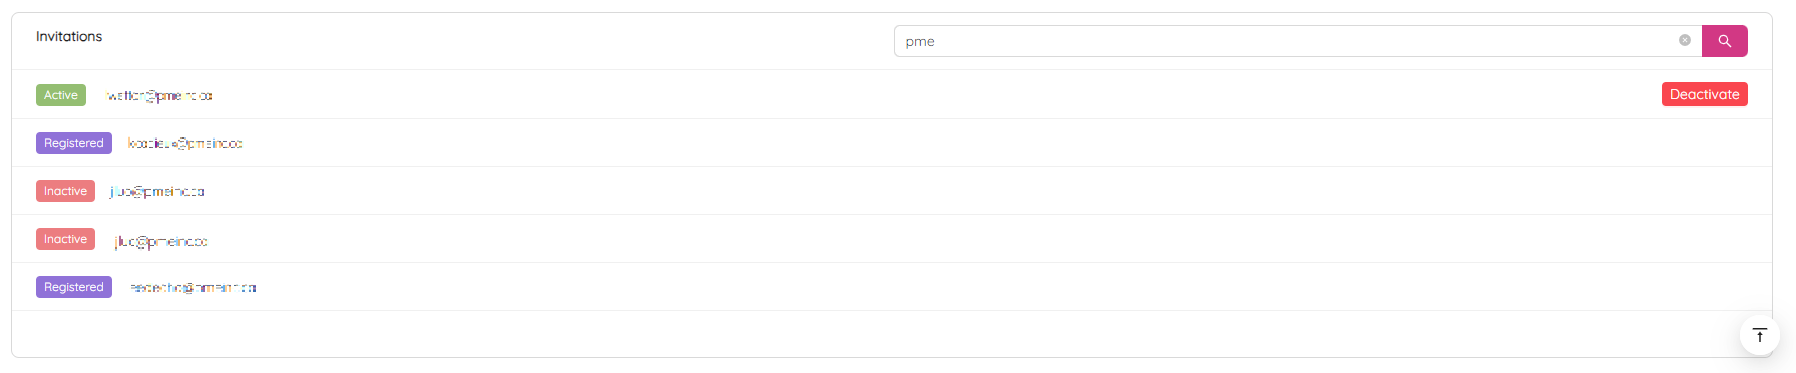
The Invitations list can be found below the Workspace Users list and displays all invitations. The Search Invitations panel can be used to easily locate specific invitations in the list. The invitation statuses are represented by colored labels and can be one of the following:
- Active - indicates that the invitation has been sent and is awaiting the user to accept it and register a profile.
- Inactive - indicates that the invitation has been revoked.
- Registered - indicates that the user has accepted the invitation and registered their profile.
You can also revoke an active invitation by clicking the Deactivate button next to the invitation.
Quick Create
The Quick Create tab allows you to quickly create new users and add them to the workspace. To use this feature, you must specify the new user's username, password, first and last name, email address, and optionally, phone number. The purpose of this feature is to streamline the user creation process, making it quicker and more efficient.
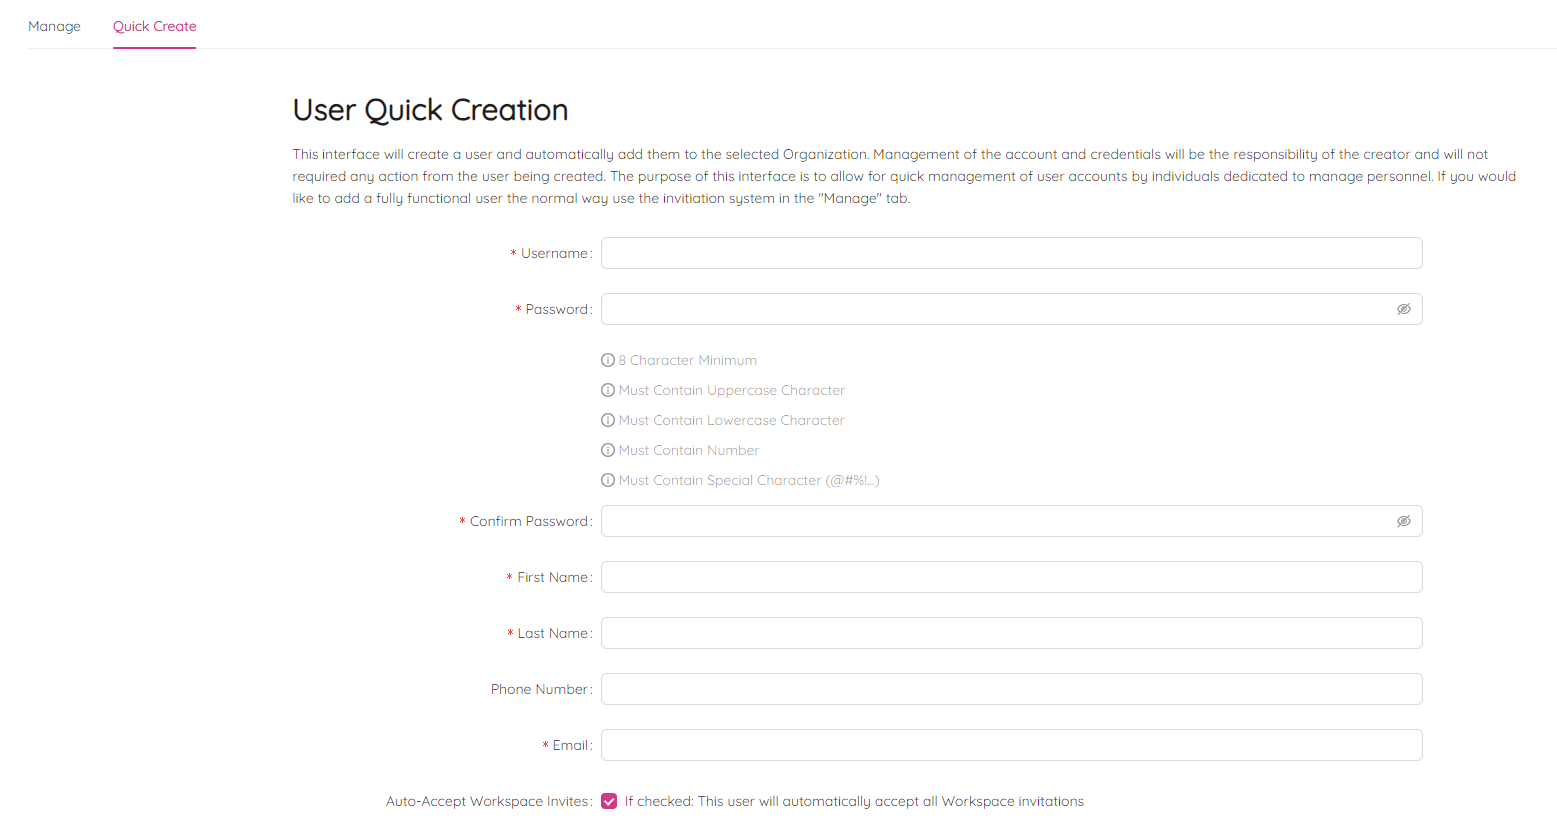
In addition to the required user information, there is also an optional checkbox labeled Auto-Accept Workspace Invites. If this box is checked, the new user will automatically accept all workspace invitations, which can be a useful feature if the user is expected to join the workspace immediately.
NOTE: combine last name with the first letter of the first name to make a Username. I.e. "John Smith" is going to be "jsmith".
NOTE: it is recommended to use a corporate email address instead of a personal one.
NOTE: The password can't be less than 8 characters and must be a combination of uppercase letters, lowercase letters, numbers, and symbols.
Workspace Locations
The Workspace locations allows users to add and manage locations where workspace assets can be relocated. When you navigate to the Workspace Locations tab, you will see a list of all previously added locations. You can easily search for a specific location in the list using the Search Locations panel at the top of the list.
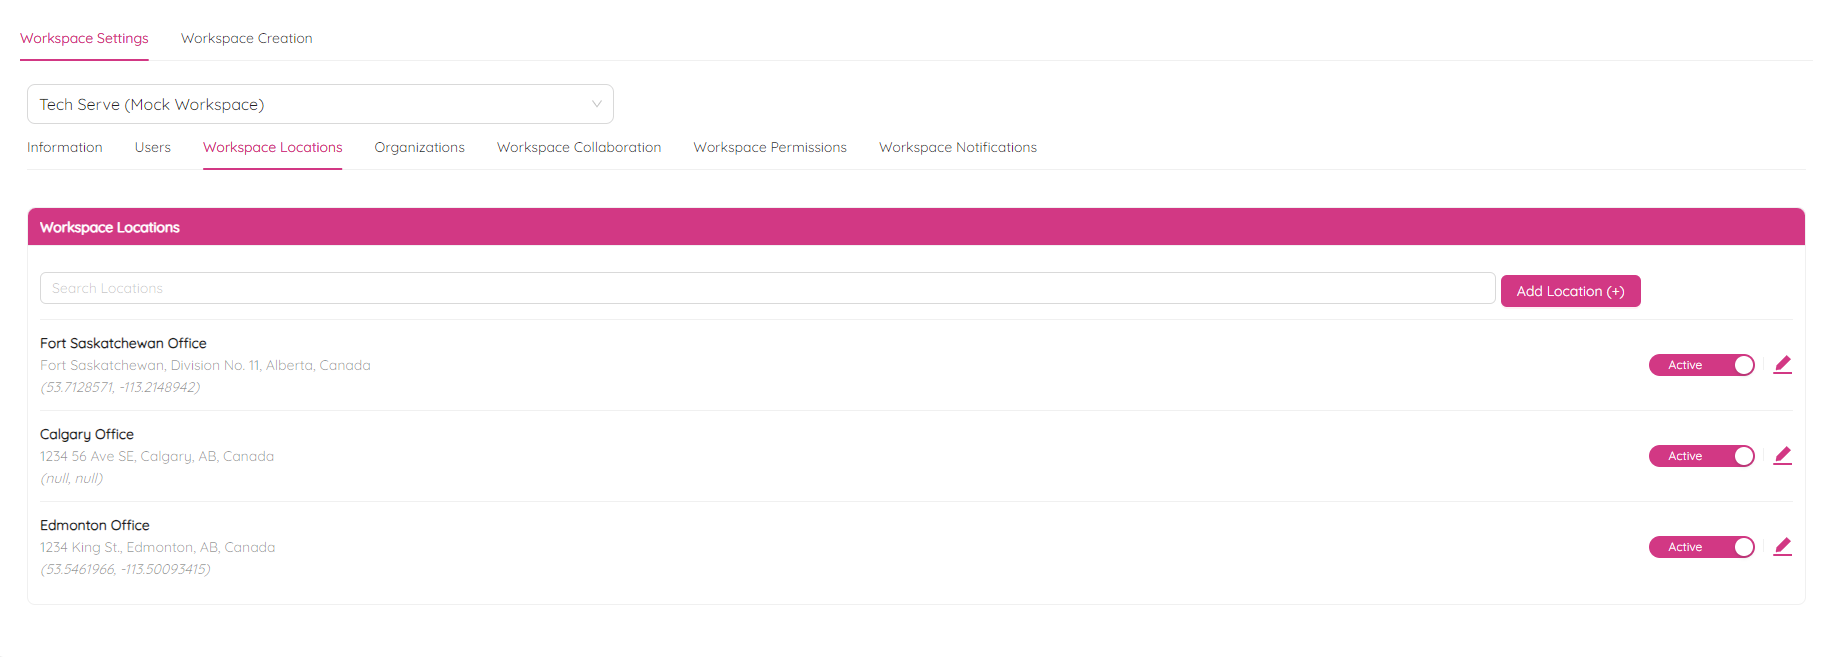
To add a new location, you simply need to click on the Add Location (+) button at the top of the list and fill out the required information, which includes the location's title and address. You can also optionally add a description and coordinates for the location. If you enter coordinates, you will be able to see the location on a minimap on the Add Location form.
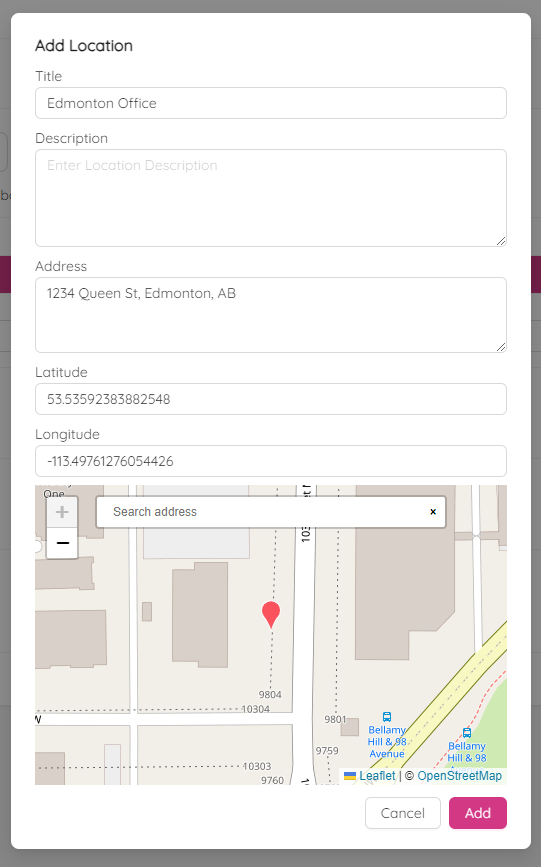
You can make any location active or inactive by clicking on the trigger next to the location. Inactive locations are not available for asset relocation. You can also edit any existing location by clicking on the ![]() icon next to the location record. You will see a form similar to the Add Location form.
icon next to the location record. You will see a form similar to the Add Location form.
Organizations
By navigating to the Organizations tab in Workspace Settings, you can add organization names to your workspace. These organization can be used when creating NCRs and RFIs (See Creating NCR and Creating RFI). This allows you to determine the organization an NCR or RFI is issued to and the designer organization. Additionally, you can select an organization when adding a person to a project (See Project Roles), as well as specify an organization when creating an audit (See Auditor Organization).
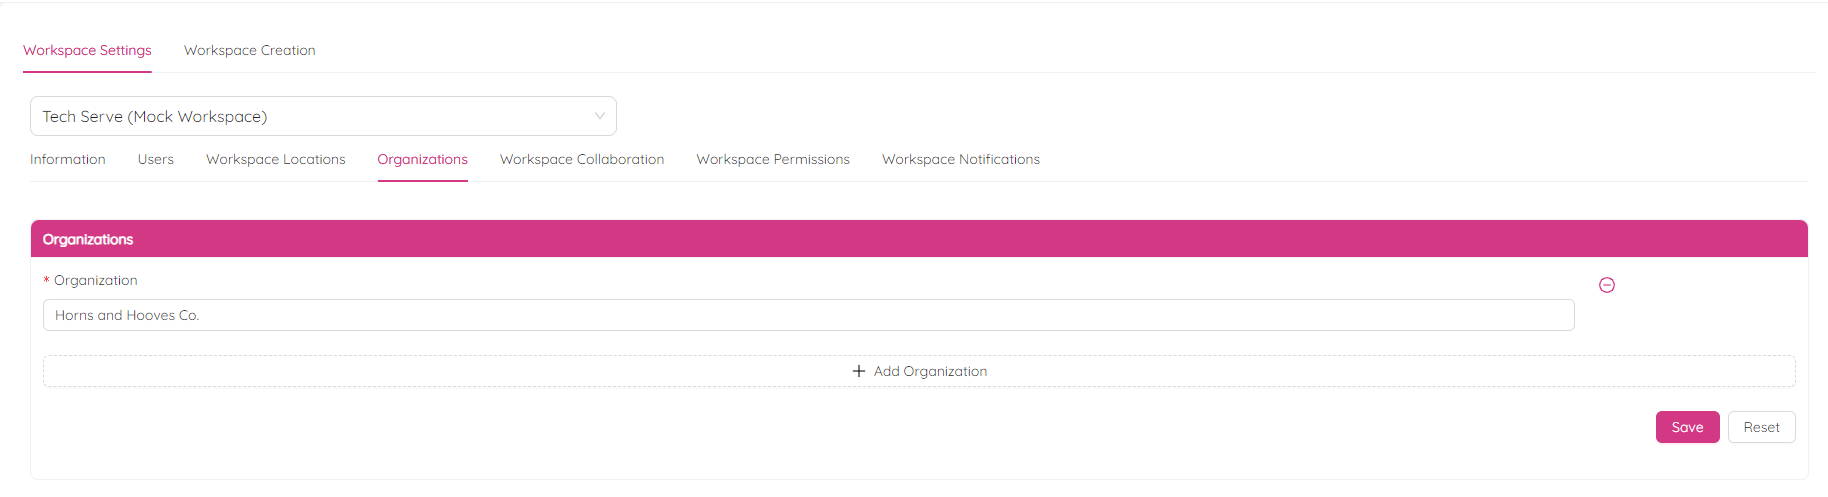
To add a new organization, you need to click on the + Add Organization button and specify the organization name in the Enter an organization name field. You can also delete an organization by clicking on the ![]() icon next to the organization. Finally, click on the Save button to confirm or Reset to cancel changes.
icon next to the organization. Finally, click on the Save button to confirm or Reset to cancel changes.
Workspace Collaboration
The Workspace Collaboration module is a powerful tool that allows you to easily share assets and training data between workspaces. When you navigate to the Workspace Collaboration tab, you'll see two lists: You're Sharing With and Shared With You.
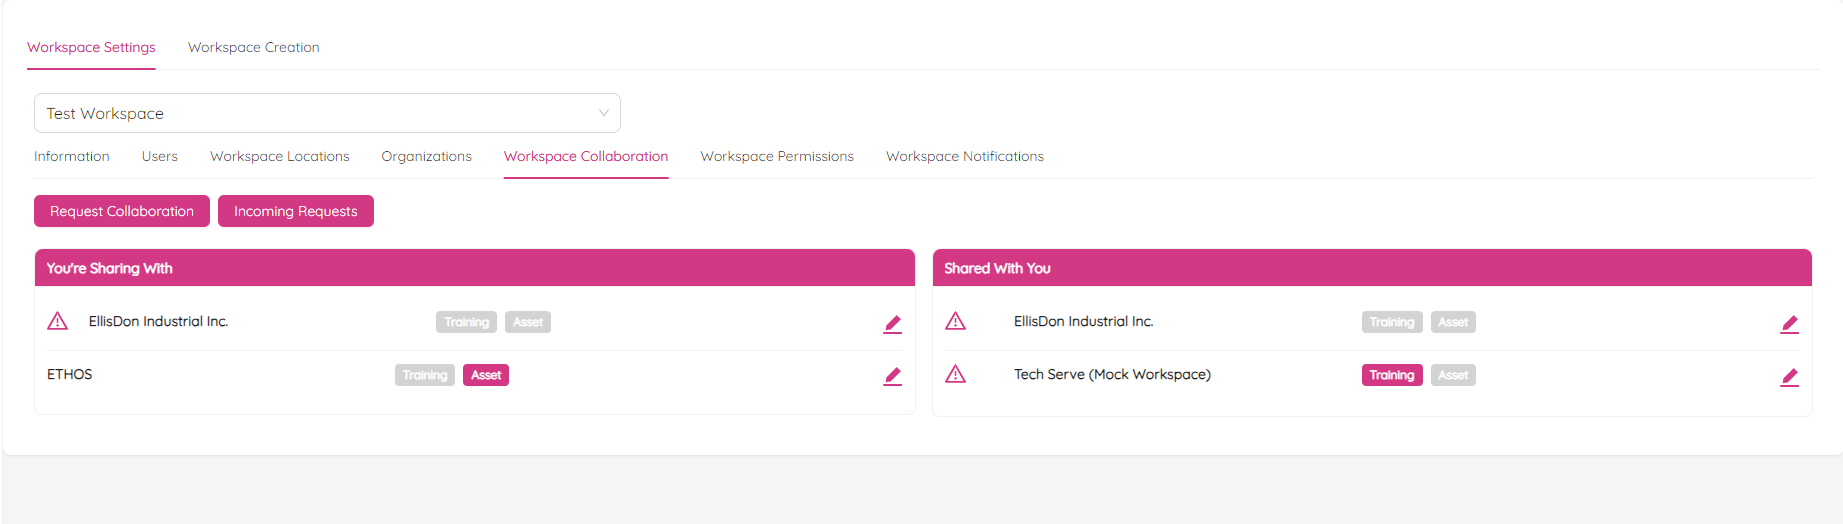
The You're Sharing With list displays a list of workspaces that can view your training and asset data from your current workspace. This feature is useful if you want to collaborate with others.
The Shared with You list displays a list of workspaces that have shared their training and asset data with you. This feature is useful if you need to access data from another workspace.
Each record in the lists has two labels, Training and Asset, which can be either grey or purple in color. The purple color indicates that you have access to the data, while the grey color indicates that you don't have access.
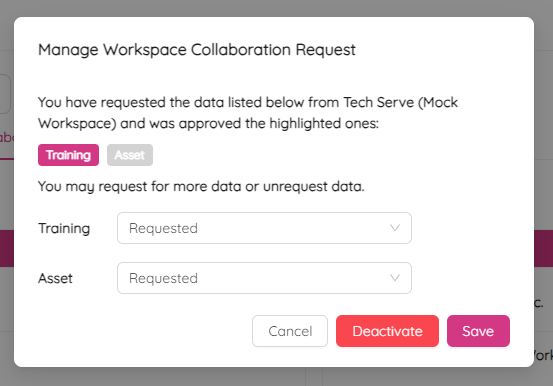
If you need to request access to training or asset data from another workspace, you can do so by clicking the Request Collaboration button at the top of the Workspace Collaboration tab. When you do this, you'll need to specify the Anonymous Workspace ID of the workspace you're requesting collaboration from (See the Workspace Information tab for the Anonymous Workspace ID), as well as the type of data you're requesting (Training, Asset, or both).

If you need to edit your collaboration request, you can do so by clicking the ![]() icon next to the corresponding record in the Shared with You list. After editing, click Save to confirm your changes. Lastly, if you need to withdraw your collaboration request, you can do so by clicking the Deactivate button. This will cancel your request. As a result you will see a
icon next to the corresponding record in the Shared with You list. After editing, click Save to confirm your changes. Lastly, if you need to withdraw your collaboration request, you can do so by clicking the Deactivate button. This will cancel your request. As a result you will see a ![]() icon next to record in the Shared With You list. If you hover the icon you will see the message confirming that collaboration has been deactivated.
icon next to record in the Shared With You list. If you hover the icon you will see the message confirming that collaboration has been deactivated.
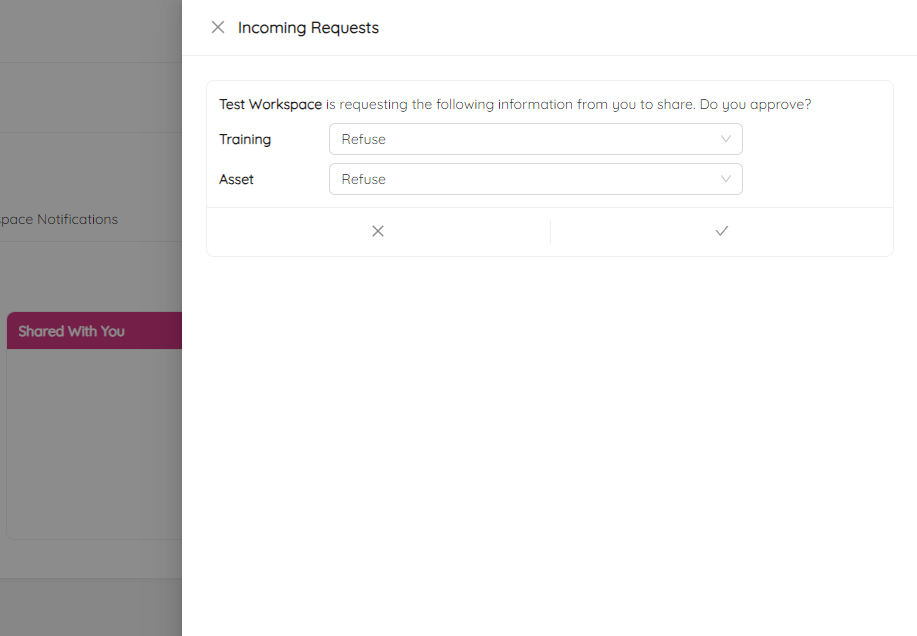
To see incoming collaboration requests, you can click on the Incoming Requests button at the top of the Workspace Collaboration page. This will display a list of all incoming requests in the right panel. For each request, you can choose to either approve or refuse access to your training or asset data.
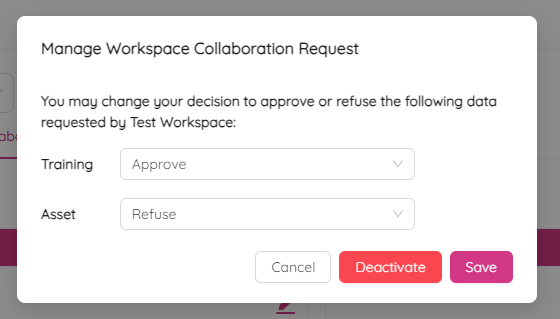
If you need to edit or revoke a previously confirmed incoming request, you can do so by clicking on the ![]() icon next to the request. From there, you can change your response to either approve or refuse access to the Training or Asset data, and then click Save to confirm your changes. Finally, if you need to revoke current access to your training or asset data, you can do so by clicking on the Deactivate button.
icon next to the request. From there, you can change your response to either approve or refuse access to the Training or Asset data, and then click Save to confirm your changes. Finally, if you need to revoke current access to your training or asset data, you can do so by clicking on the Deactivate button.
Overall, the Workspace Collaboration module is a great way to share and collaborate with others, and makes it easy to access data from other workspaces when you need it.
Workspace Permissions
The Workspace Permissions module is a powerful tool that allows you to configure user access to a workspace. The Workspace Permissions tab is divided into two parts. On the left, you can see a list of all the users who have access to the workspace. To set permissions for a user, simply select their name from the list. You can use the search panel at the top of the list to find a specific user. Once you have selected a user, you will see a list of permissions in the grid on the right.
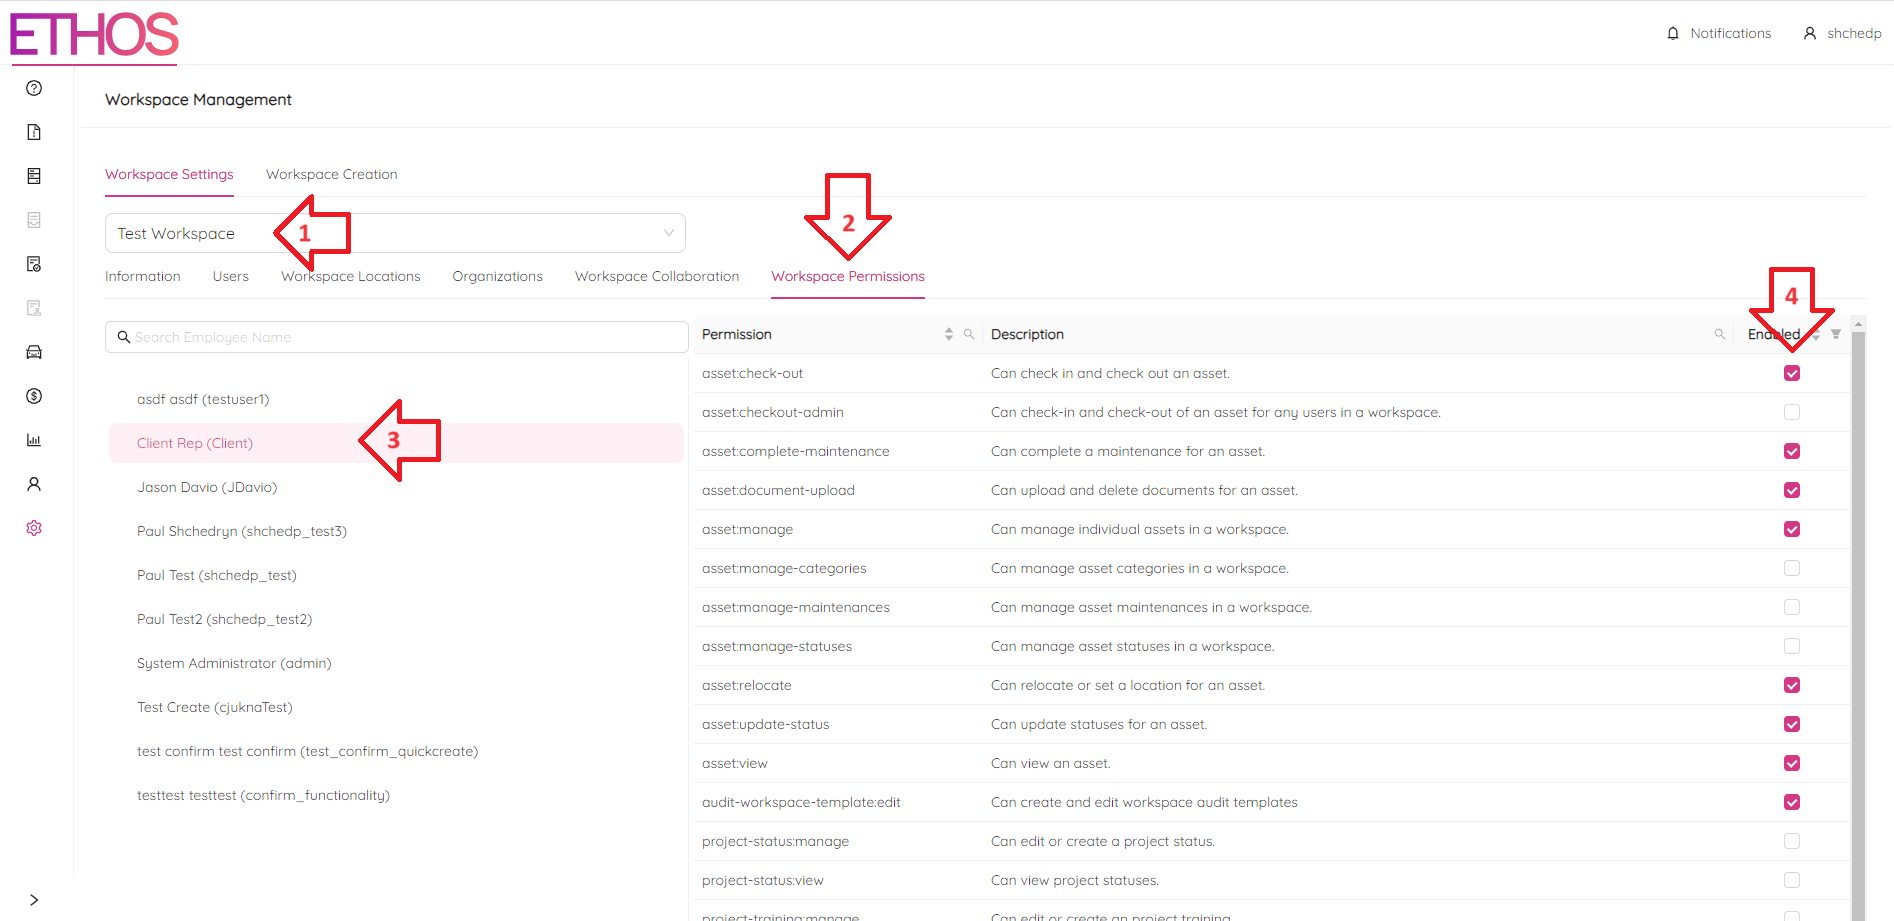
To grant a permission to the user, simply click on the checkbox next to the permission. To revoke a permission, simply uncheck it. You can use the search panel ![]() to find specific permissions or filter
to find specific permissions or filter ![]() permissions by their status.
permissions by their status.

You can also sort the table by permission name, description, or status. This allows you to easily find the permissions you need and make changes quickly.
Workspace Notifications
The Workspace Notifications tab allows you to set up a recipient to receive notifications about every action taken to RFIs, NCRs, or assets in the workspace. On the tab, you can see the Default Notifications Email field, where you can set up the recipient. This means that the recipient will receive an email notification every time an action is taken on these items in the workspace.

Additionally, you can also set up the recipient to receive notifications when any action is taken on a workspace asset. However, it's important to be cautious when setting up these notifications, as they can become overwhelming and cause soliciting.