Asset Single View
An asset single view page is a convenient place where you can view all relevant information related to a specific piece of equipment. It provides a comprehensive overview of the asset's current status, maintenance history, location, and any other key details.
Overview
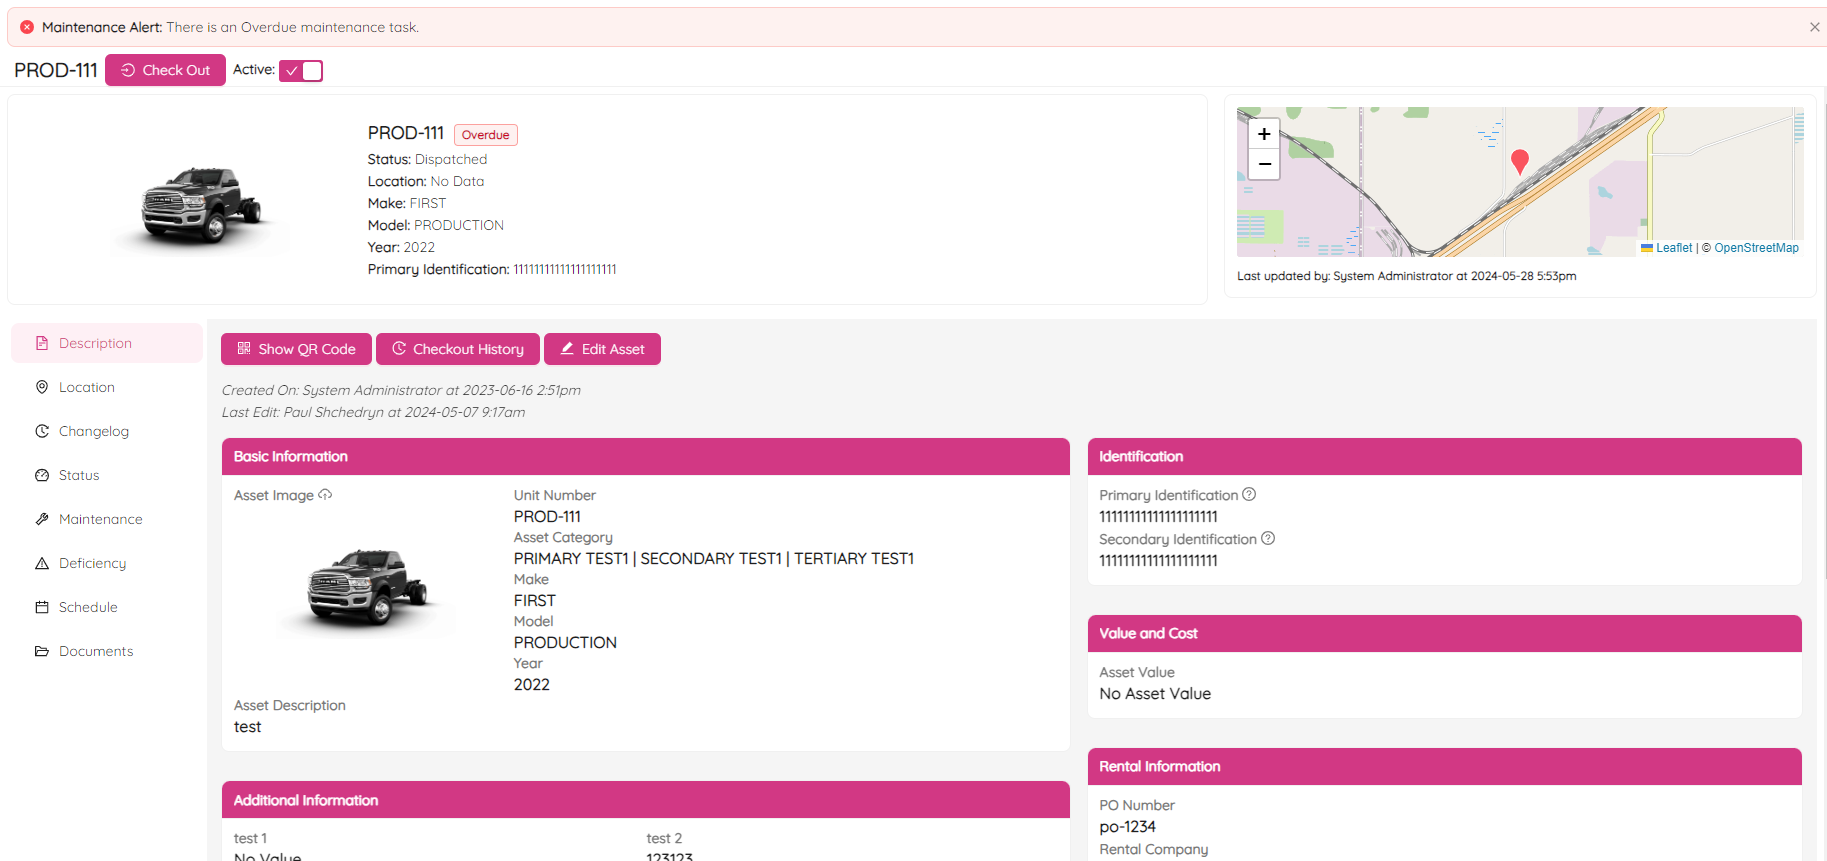
To get to an asset single view While having the Asset List page open, click anywhere in the row for the particular asset you want to open. As a result, you will see an Asset Single View page similar to the following.
NOTE: Hovering over a question mark
gives you a detailed description of the asset's attribute it is attached to.
The page is divided into two parts. At the top of the page you can find all basic asset details, such as asset image, unit number, location, and others.

By clicking on the Check-Out button you can check-out the asset. See Check-In and Check-Out Asset article for more information.
Clicking on the Active toggle will let you make the asset active or inactive accordingly.
Below asset basics you will see more details devided into the following eight categories:
- Description
- Location
- Changelog
- Status
- Maintenance
- Deficiency
- Schedule
- Documents
By clicking on the navigation panel at the left side you can switch between categories.
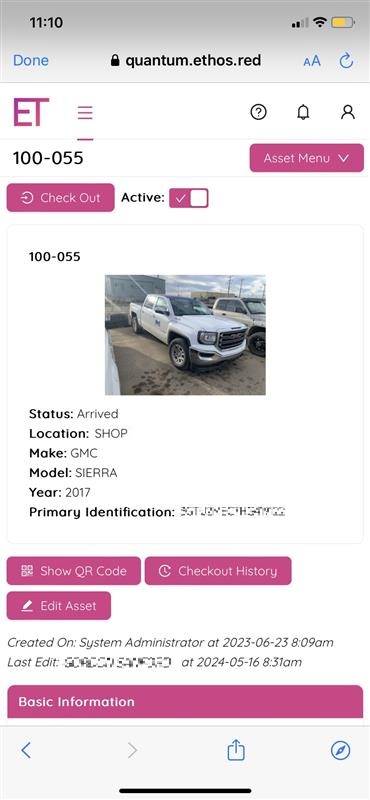
An important feature of the Asset Single View is its mobile adaptiveness. When you browse the web page on a mobile device, the layout of the web page changes to fit the screen size of your device. In mobile view the app still allows the same functionality as in the desktop browser. You can still view asset details, update asset statuses, and perform other asset management tasks on your mobile device.
Description
At the top of the asset description page, you can access important asset management features such as the Show QR Code, Checkout History, and Edit Asset buttons, as well as view the date and time when the asset was created and last updated, and the name of the person who created or made changes to the asset. Below, you can find a detailed description of the asset broken into several sections like Basic Information, Identification and others.

QR Code
Show QR Code button allows you to get an asset QR Code. Scanning the code with your phone will take you directly to the asset Single Page View in the ETHOS application.
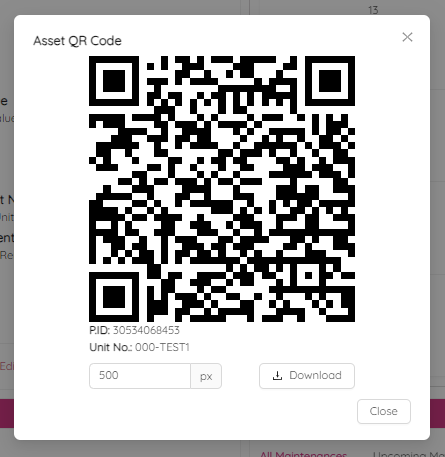
You can download the QR code for the selected asset to save on your computer or print a hard copy as required. To make the image larger when printed, simply increase the following value.

Checkout History
Located beside the Show QR Code button, the Checkout History button allows you to quickly access a pop-up panel displaying the complete checkout and check-in history for the asset, including the date, time, and name of the person responsible for each action.
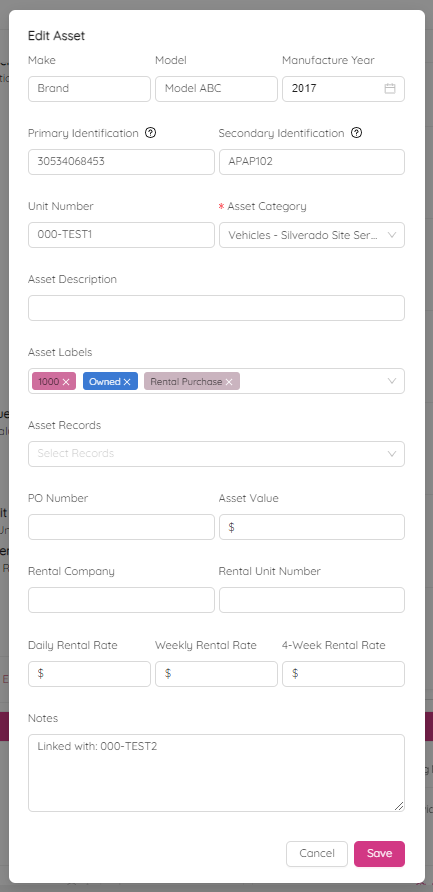
Edit Asset
Clicking on the Edit Asset button at the top of the desctiption section will let you to change make, model, mategory and many other asset attributes.
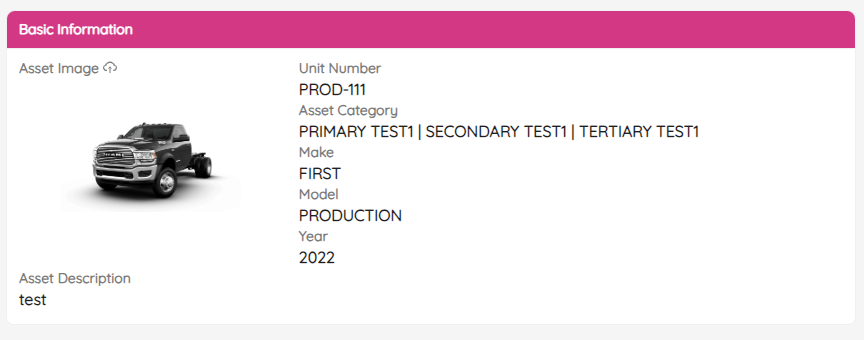
Basic Information
Basic Information section mostly repeats details shown at the top of the asset single view page. Additionaly it allows to upload a new asset image by clicking on the ![]() icon.
icon.
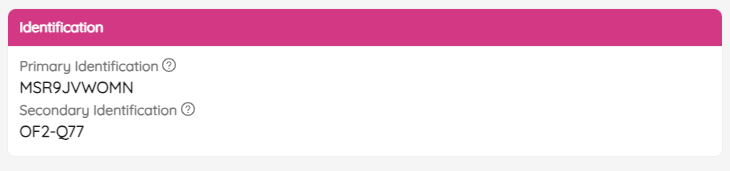
Identification
The Identification section contains two key identifiers for the asset: the Primary ID and Secondary ID. The Primary ID is a unique number assigned to the asset that distinguishes it from other similar assets, such as a Vehicle Identification Number (VIN) on a car or a serial number on a power tool. The Secondary ID is also a unique number assigned to the asset, but it is not the primary identifier. An example of a Secondary ID is a license plate number on a vehicle. Together, these two identifiers help to ensure accurate tracking and management of the asset.
Value and Cost
The Value and Cost section displays the asset's value, which is typically the amount of money paid to acquire the asset.

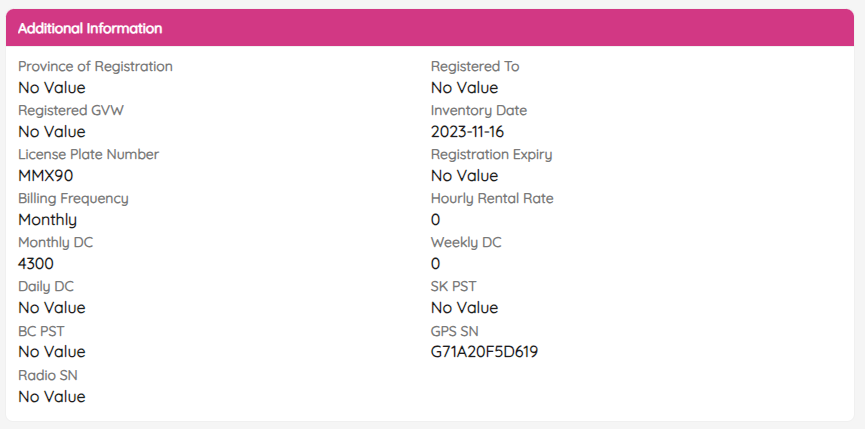
Additional Information
Additional Information provides supplementary details about the asset, such as monthly depreciation cost, registration expiry, and other relevant data. Depending on the category of the asset, you can customize a list of additional attributes to capture specific information that is unique to that asset type.
NOTE: Please, refer to the Dynamic Asset Details Management article for more information.
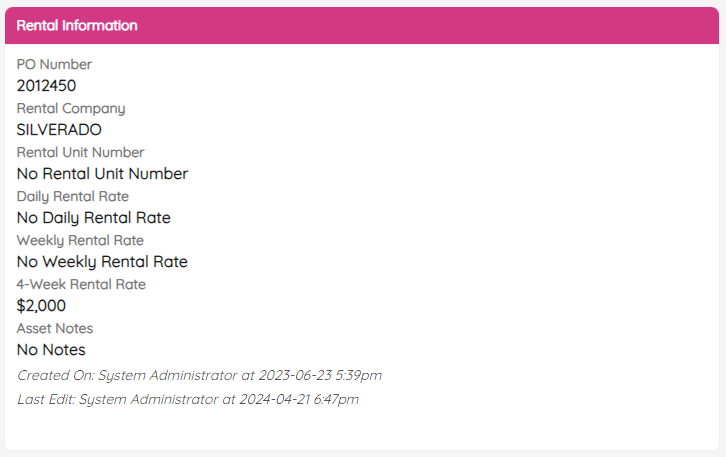
Rental Information
Rental Information provides comprehensive details about the asset that is available for rent. This includes essential information such as:
- PO Number
- Rental Copmany
- Rental Unit Number
- Daily Rental Rate
- Weekly Rental Rate
- 4-week Rental Rate
- Asset Notes
Asset Labels
The Asset Labels section displays the labels assigned to a particular asset, providing a quick and easy way to identify and track the asset.
NOTE: Please, refer to the Asset Labels article for more information about how to create labels.

Asset Records
The Asset Records section provides a list of records that an operator must obtain before being authorized to use the asset. By requiring the operator to obtain these records, the organization can ensure that the asset is being used safely and effectively, minimizing the risk of accidents or damage to the asset.

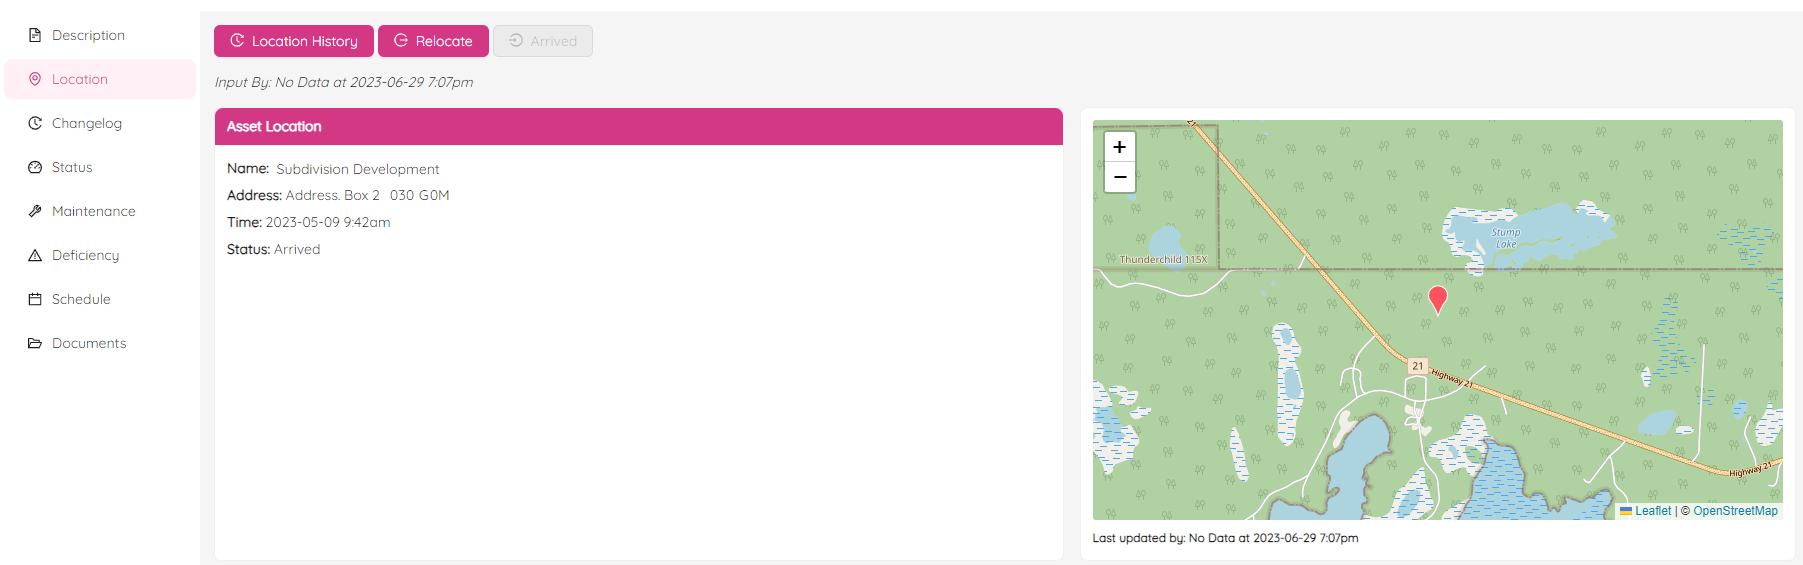
Location
The Location page provides a comprehensive view of an asset's current and previous locations, as well as the ability to relocate the asset if necessary. Location information includes the project name, address, time of relocation, and the status of the relocation process.
On the right-hand side of the page, you can also access a location map. To adjust the map's zoom level, simply click the "+" or "-" button at the top left corner of the map or use your mouse wheel to zoom in or out. This feature allows you to get a more detailed view of the asset's location and surrounding area, helping you to better manage and track your assets.
Relocate
To relocate an asset, simply click on the Relocate button and fill out the form provided.
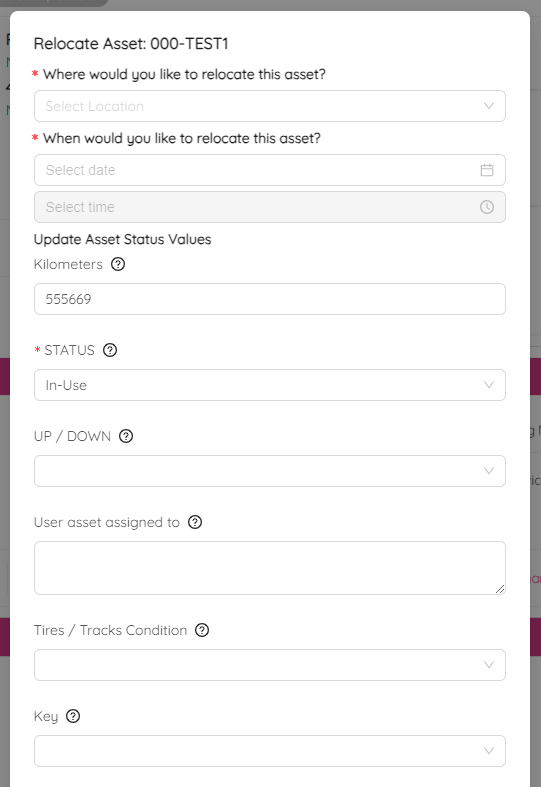
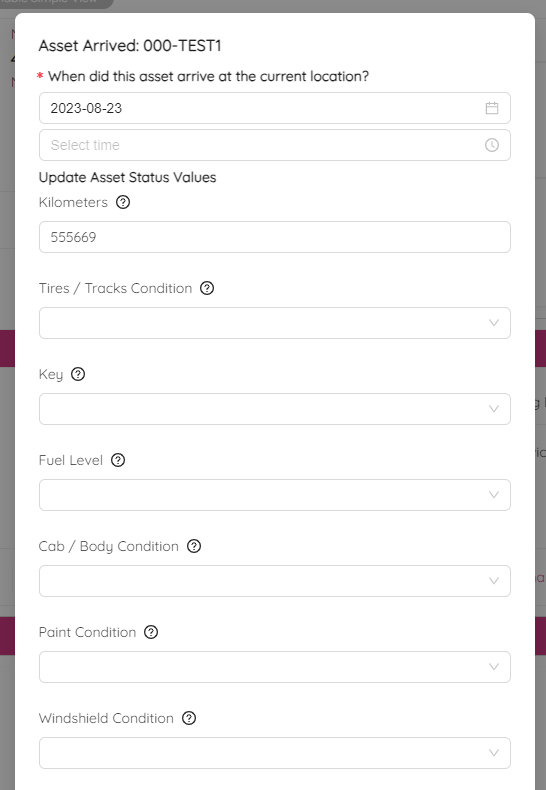
Once confirmed, the relocation status will change to Dispatched and the Arrived button will turn red, allowing you to update the arrival information.
When the asset arrives, click on the Arrived button to update the arrival status with important details such as the date, time, and receiver name. You can also upload documents and photos related to the asset.
The Location History section will show the asset's arrival status, indicated by a green icon, and can be edited or deleted as needed.
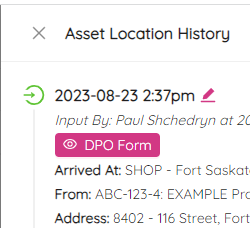
Location History
To view the location history of an asset, simply click on the Location History button located at the top of the Location section.
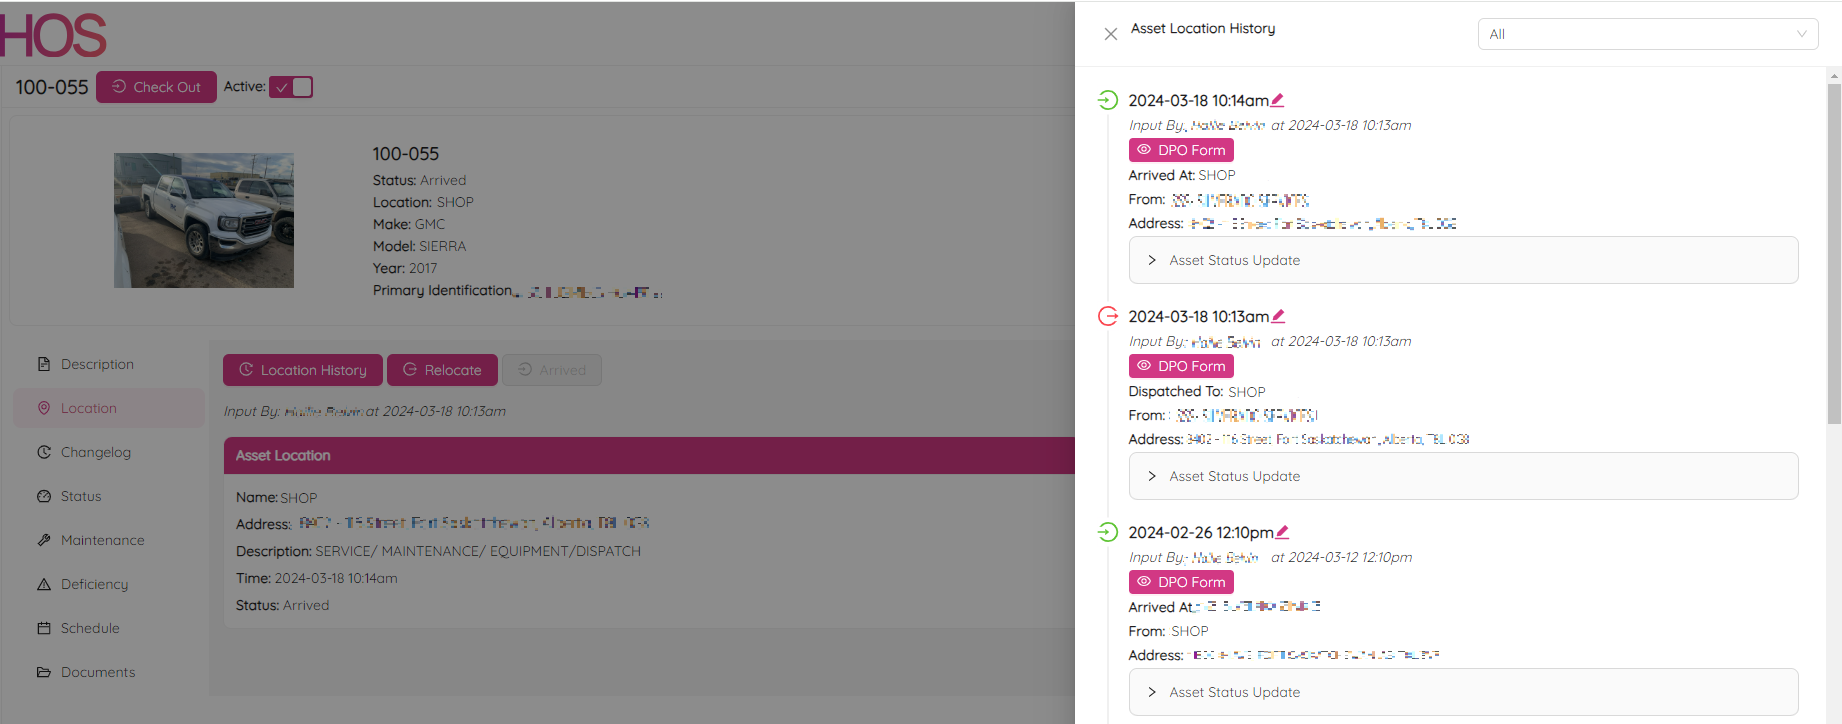
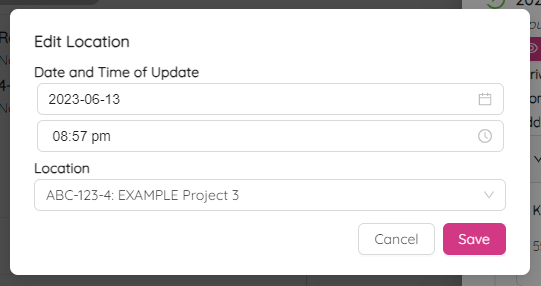
Here, you can not only download the Delivery and Pickup Order (DPO), but also make changes to the asset's location history such as the date, time, and location.
To edit any of the history records, simply click on the ![]() button.
button.
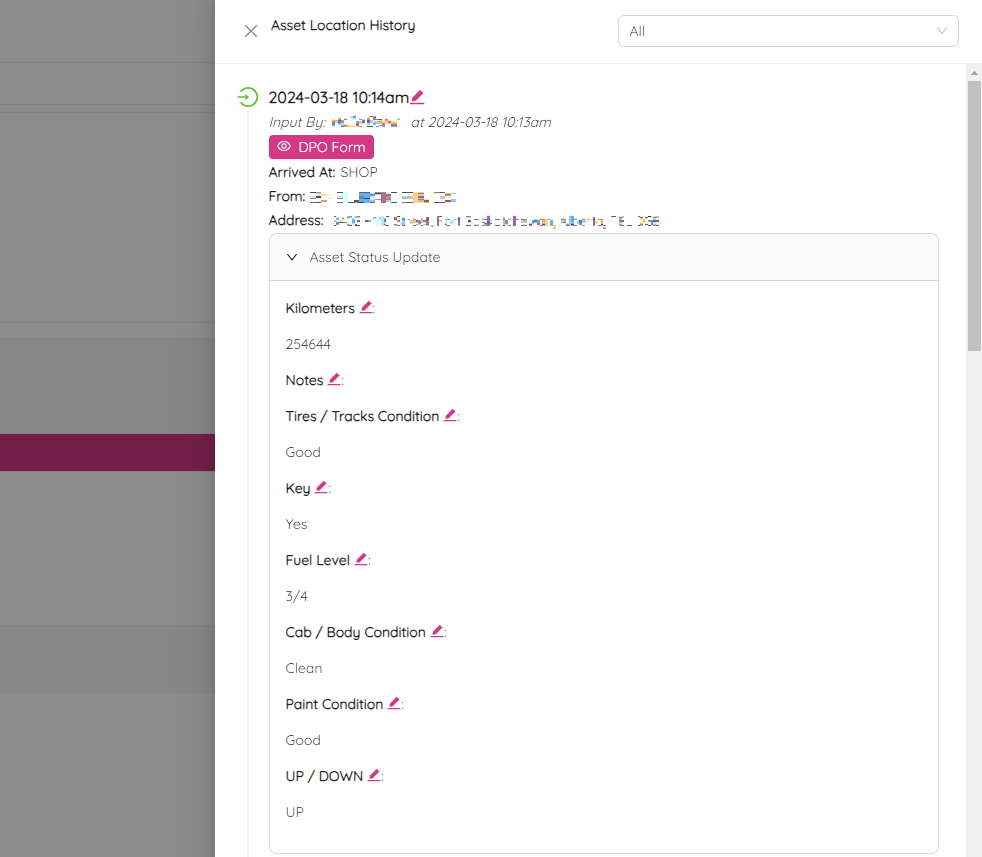
Under the Asset Status Update section you can find all statuses that were changed at the asset arrival or dispatch. You can easily change any of these statuses by clicking on the ![]() icon.
icon.
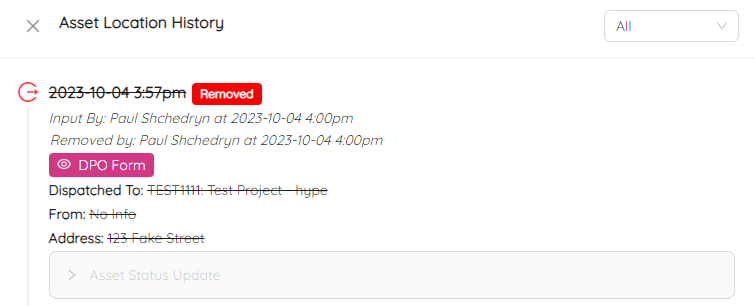
If you need to delete the last undeleted relocation record, simply click on the ![]() icon, select Delete, and confirm.
icon, select Delete, and confirm.

The deleted location record will then be crossed-out and marked as Removed.
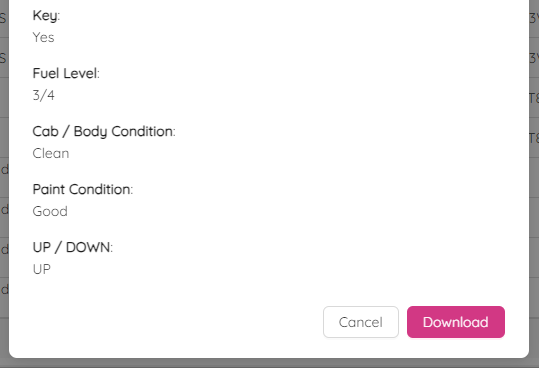
To download a DPO, click on the DPO Form button and follow the prompts to download a PDF file.
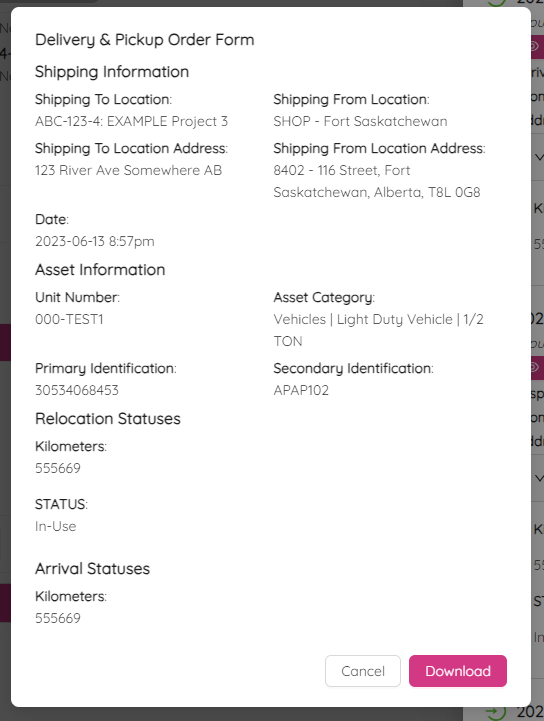
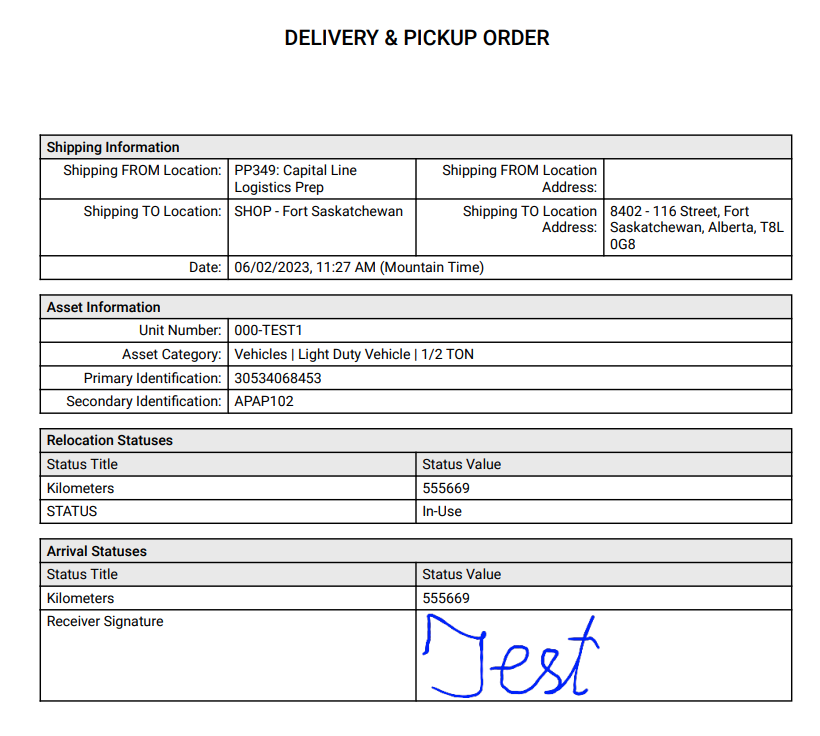
Click on the Download button and confirm by selecting Yes. As a result you will get a PDF file similar to the following.
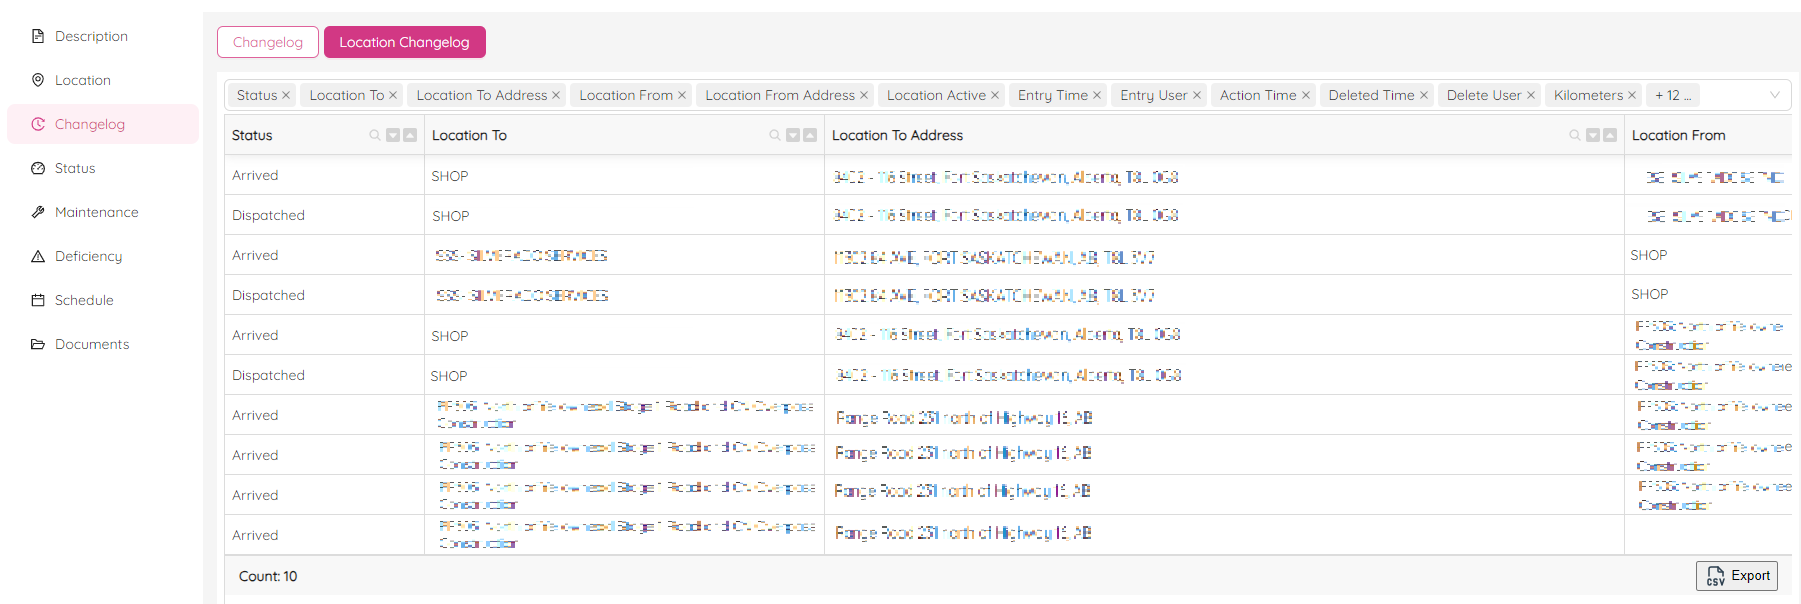
Changelog
On the asset Changelog page you can keep track of all changes made to the asset. This page includes two logs: the general Changelog and the Location Changelog. You can easily switch between them by using the buttons located at the top of the page.
General Changelog
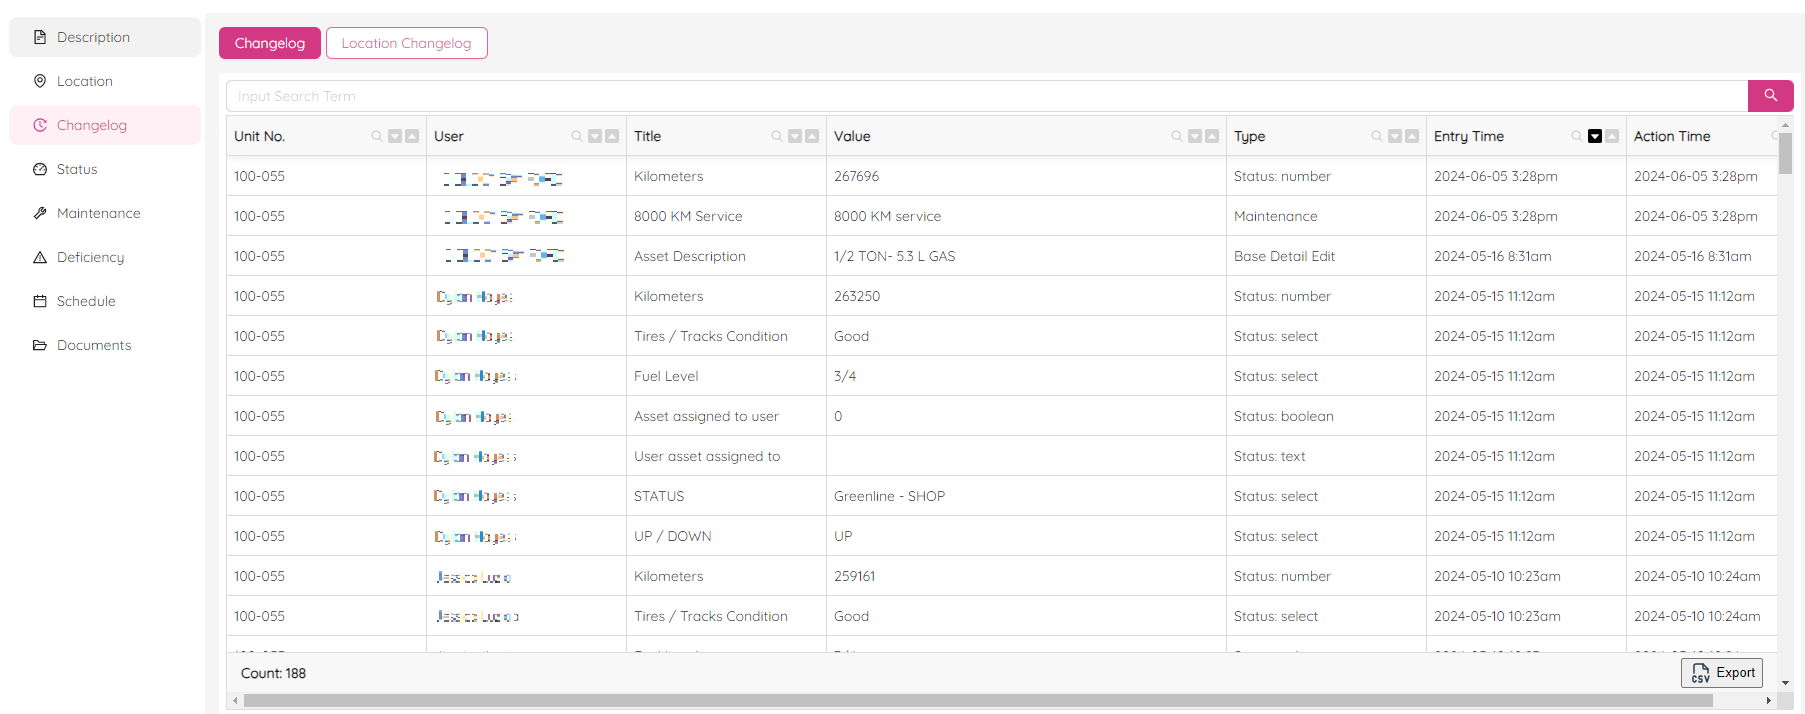
The general Changelog shows the history of the asset's attributes, including value, entry time, actual time, and many others. At the top of the page, there is a search panel that you can use to search across the log.
To sort the logs by a specific attribute, simply click on the ![]() and
and ![]() icons located at the log headers. Clicking on the
icons located at the log headers. Clicking on the ![]() icon will sort the logs in ascending order, while clicking on the
icon will sort the logs in ascending order, while clicking on the ![]() icon will sort the logs in descending order.
icon will sort the logs in descending order.
To filter the logs by a specific attribute, simply click on the ![]() icon located at the log headers. This feature allows you to easily filter the logs based on your specific needs. You can even filter by multiple attributes at the same time.
icon located at the log headers. This feature allows you to easily filter the logs based on your specific needs. You can even filter by multiple attributes at the same time.

At the bottom of the page, you will see the current filter settings and the amount of filtered records. Here, you can cancel any of the filters that are currently applied.

Location Changelog
The Location Changelog shows the history of the asset's locations, including location status, address, time, and the user who made changes.
You can view a Delivery & Pickup Order form by clicking on any record. Additionally, you can download it as a PDF file by clicking on the Download button at the bottom of the form.
At the bottom of both logs, there is an Export button which allows you to export the data to a CSV file. This makes it easy to share the asset's history with others.
Status
In this section, you can view and update asset status as well as change status history.
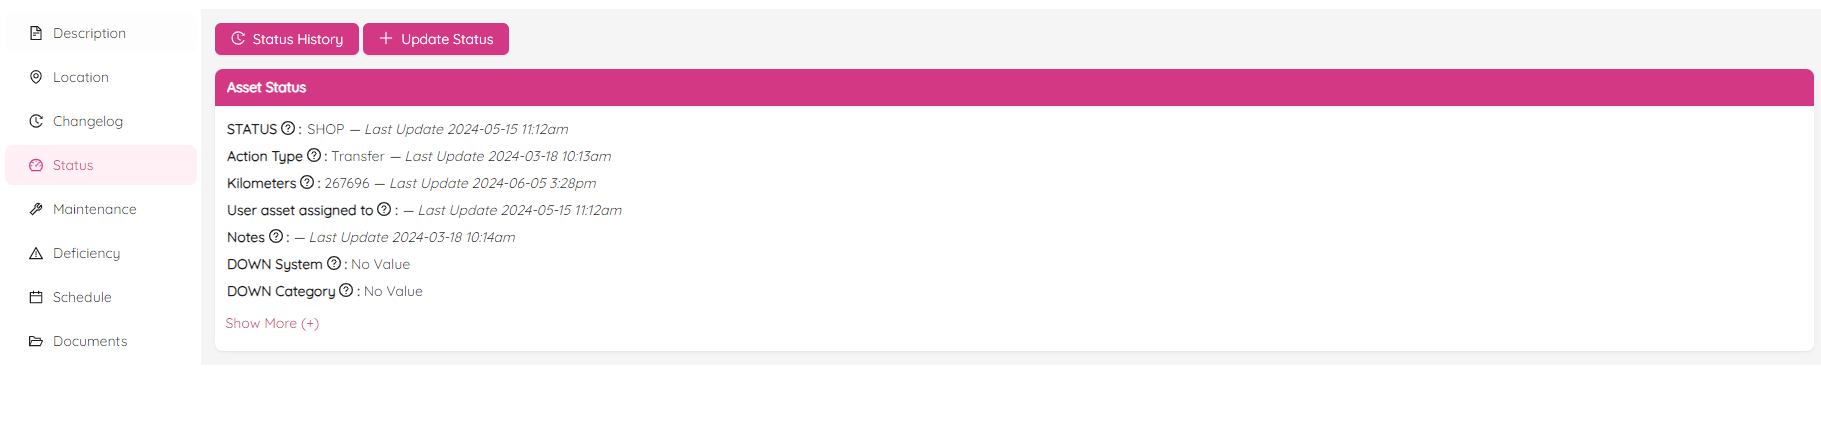
NOTE: Status page always reflects only the latest updated statuses. By default, it has a condensed view. However, you can expand it by clicking the Show More (+) link. To see how to define what is shown in the condensed view, follow the Assign Asset Status manual.
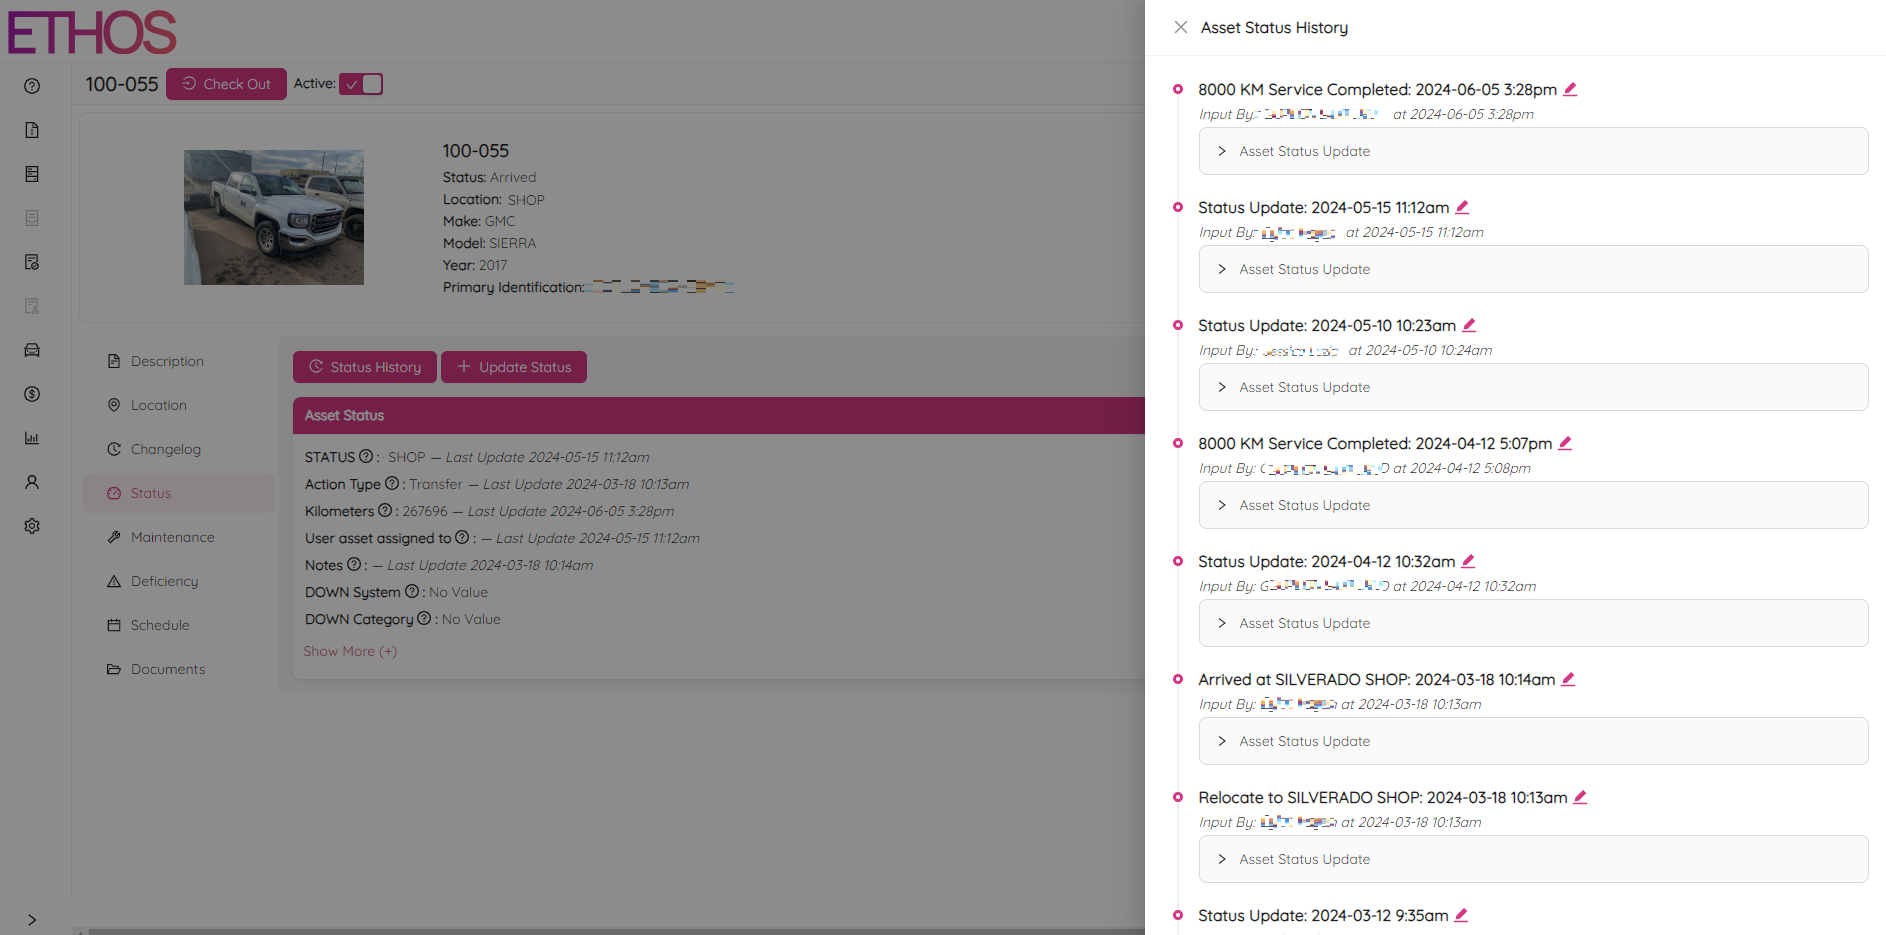
By clicking on the Status History button, you can view all history of the asset. Click on the ![]() button to update any status, including date, time, mileage and others.
button to update any status, including date, time, mileage and others.
By clicking on the + Update Status button, you can update asset status details.
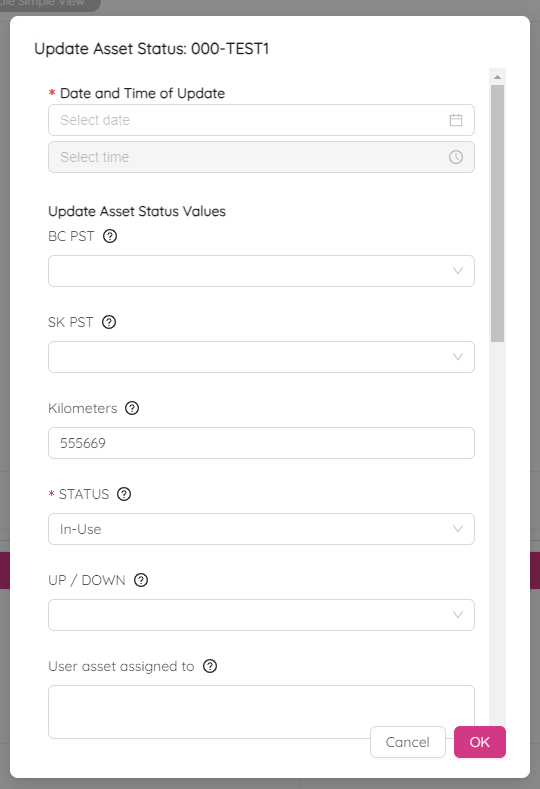
Pick date and time from calendar, update asset details and upload documents and photos.
NOTE: You can upload up to 6 files at a time. If you use ETHOS on your mobile device, you can make a picture while uploading photos as an asset walk around.
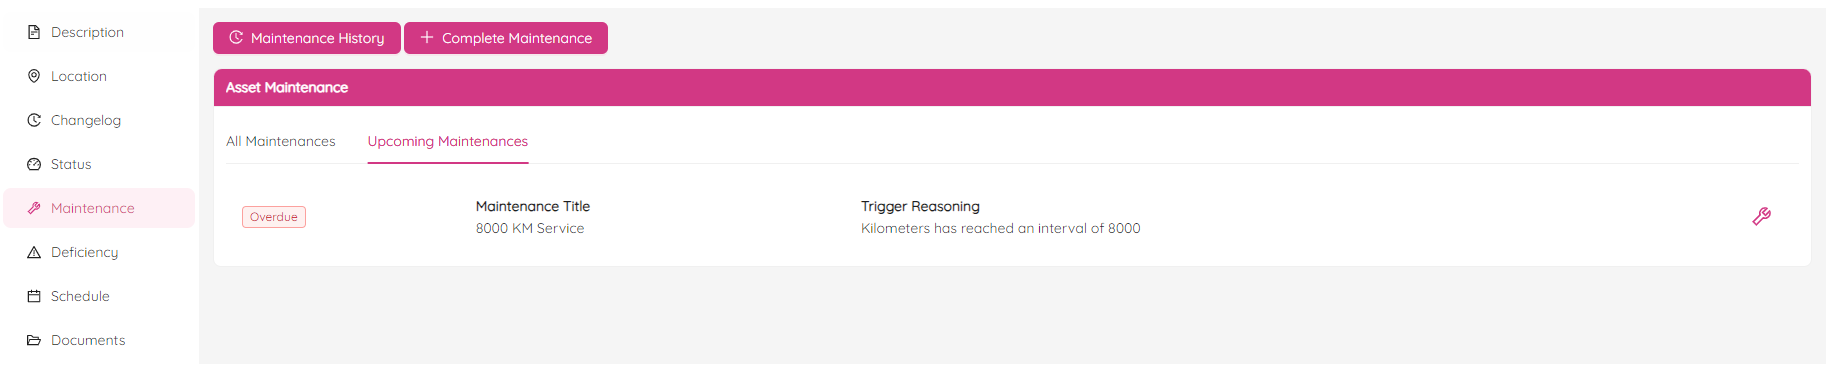
Maintenance
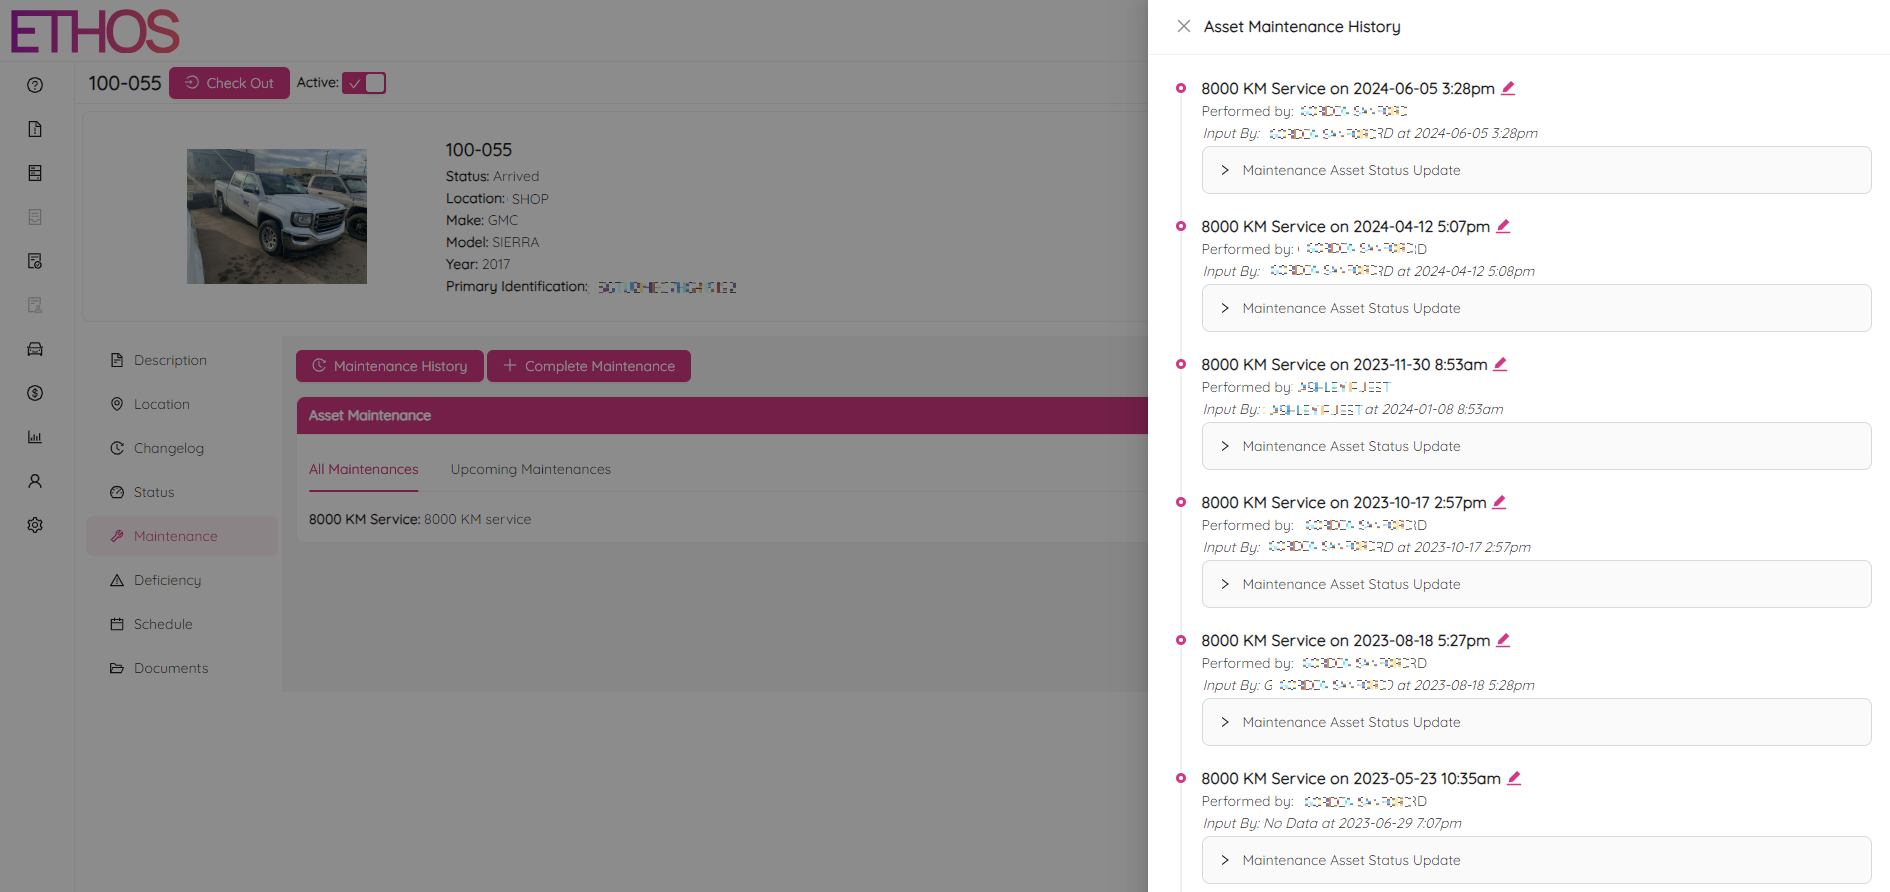
The maintenance section allows you to update completed maintenance, schedule maintenance, and view and change maintenance history if you have permission.

In order to view history click on the Maintenance History button. Click on the ![]() icon to update a maintenance record including date, time, mileage and others.
icon to update a maintenance record including date, time, mileage and others.
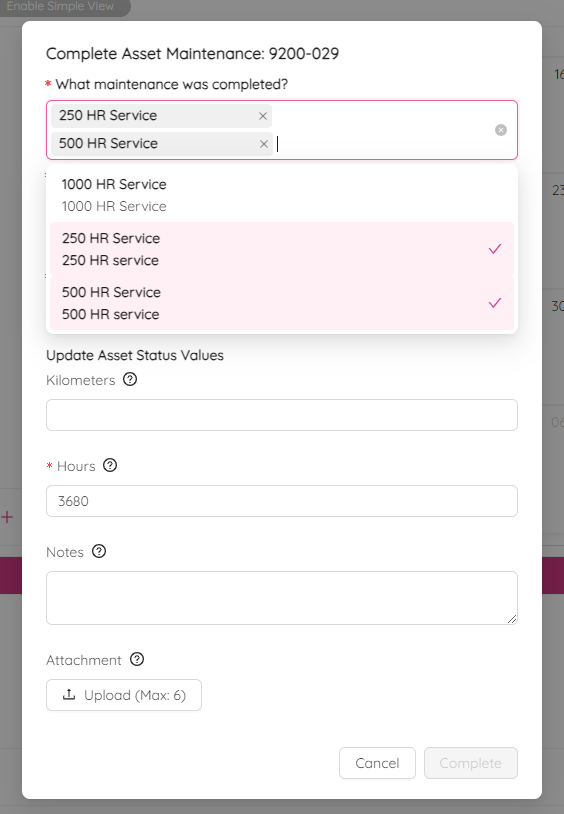
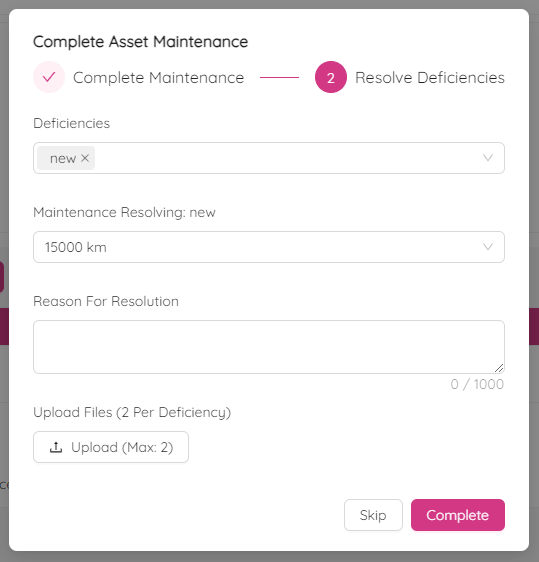
By clicking on the + Complete Maintenance button, you can add a new record about completed maintenance.
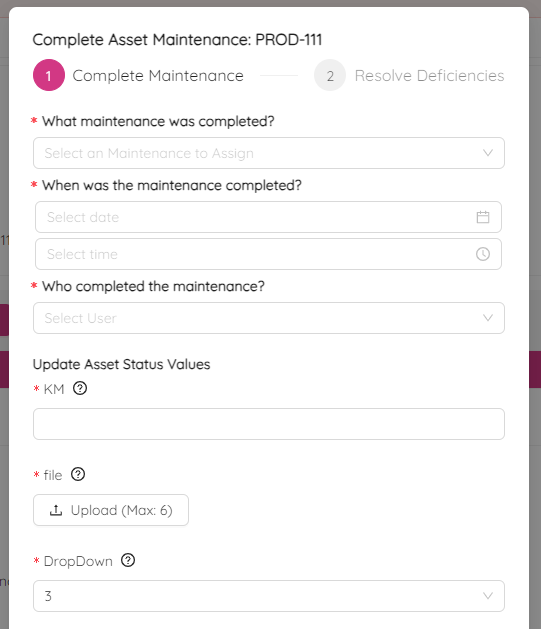
When it comes to maintenance, you have the option to select multiple services simultaneously. This is particularly useful for assets that require both 500HR and 250HR service sets. You can leverage this feature when receiving the assets from the vendor to initiate both service frequencies simultaneously. Simply select several maintenances at once by clicking on them.
If the asset has unresolved deficiencies, you have an option to resolve them during the maintenance process or leave them unresolved by clicking the Skip button.
If you need to log a maintenances that are overdue, you can do it by navigating to the Upcoming Maintenances tab and clicking the wrench button located to the right of every upcoming maintenance.
If the new asset is a rental then the maintenance information will usually be the following:
- Maintenance Date = Date the asset was rented
- Maintenance Performed By = VENDOR
- Hours/Kilometers = Odometer value when rented
Deficiency
The asset deficiency page helps to keep track of all reported deficiencies for our assets, ensuring that our assets are in top condition and safe for use. On the page you will find the total number of critical, unresolved, and resolved deficiencies.
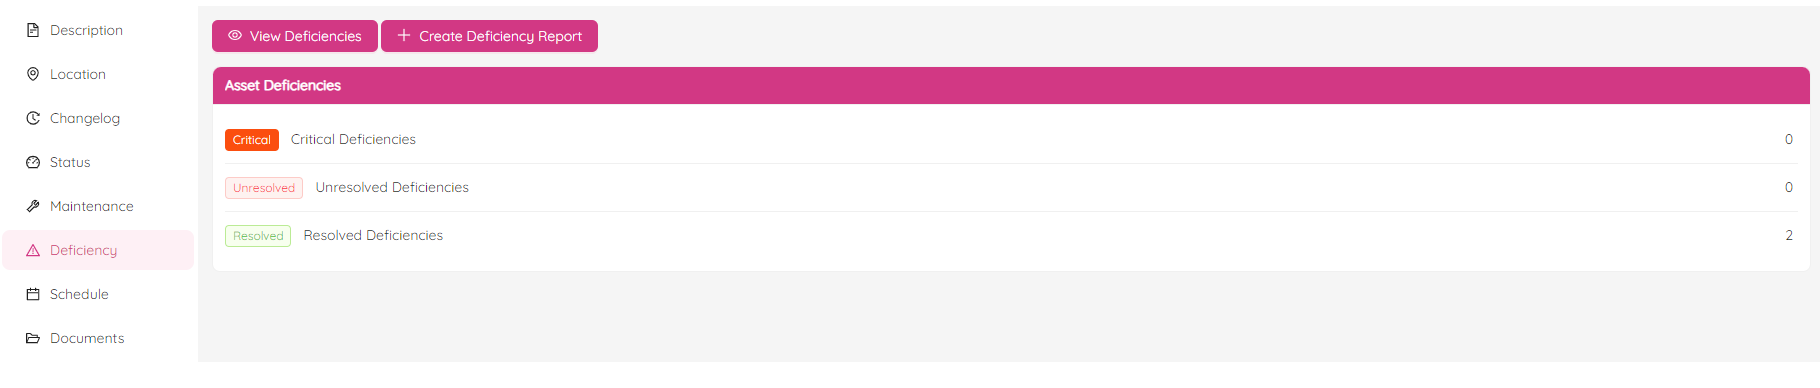
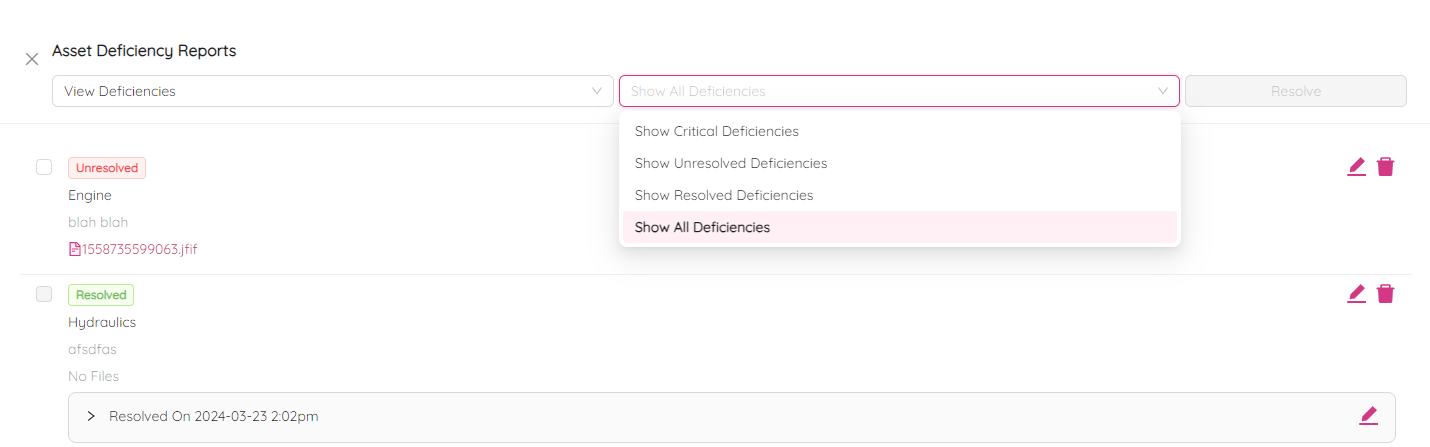
To view all reported deficiencies, simply click on the View Deficiencies button. You can view the deficiencies as a list of reports or as a list of deficiencies, and see the date and time when each deficiency was reported, its status, short description, and date and time when it was resolved.
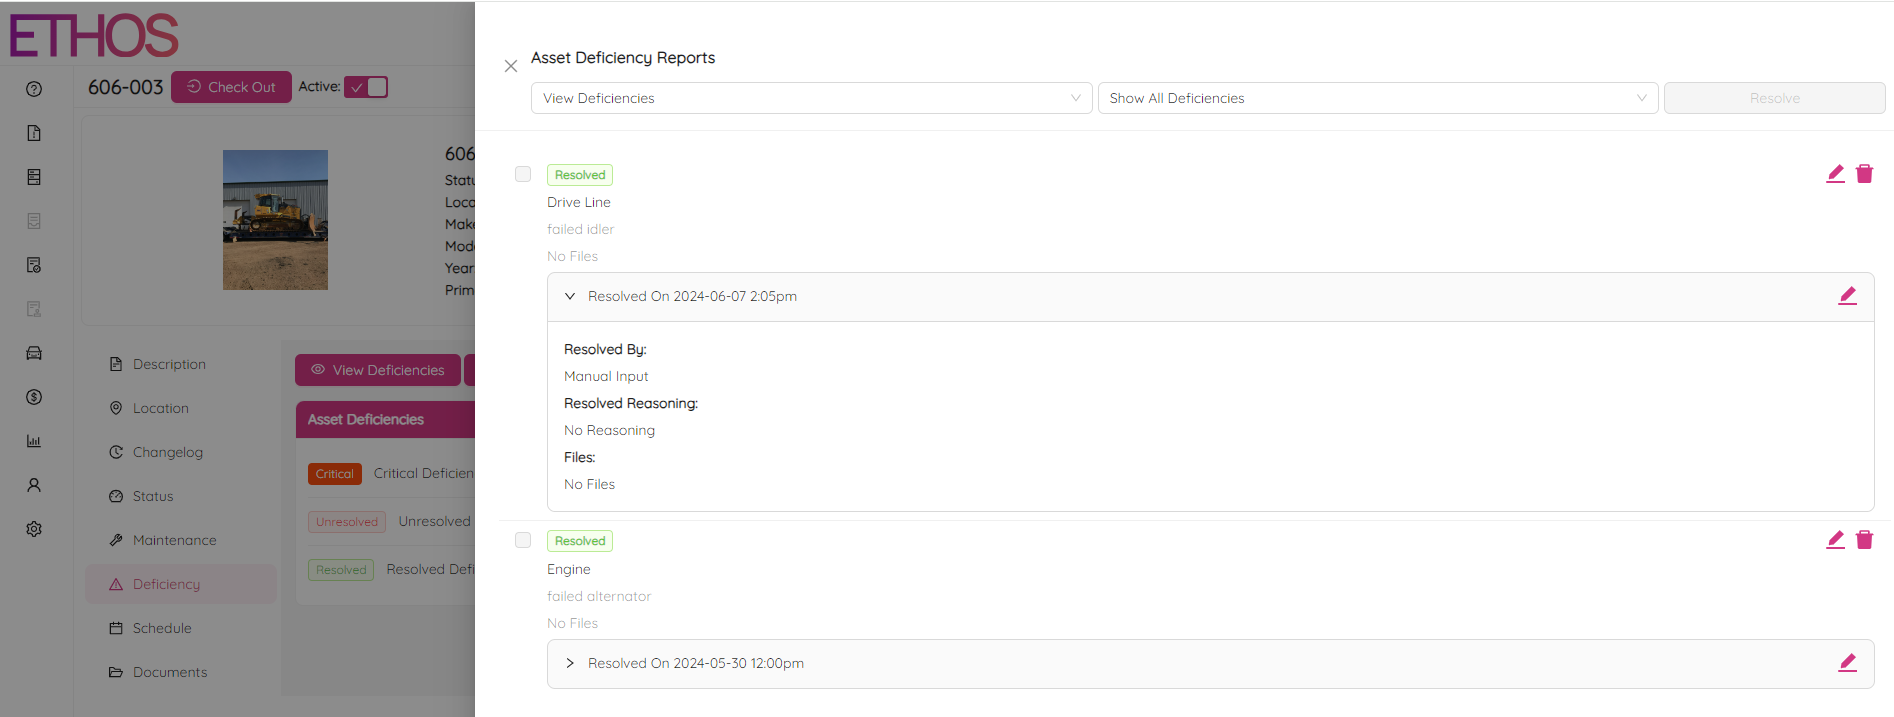
You can easily edit or delete any record by clicking on the ![]() icon next to the record.
icon next to the record.
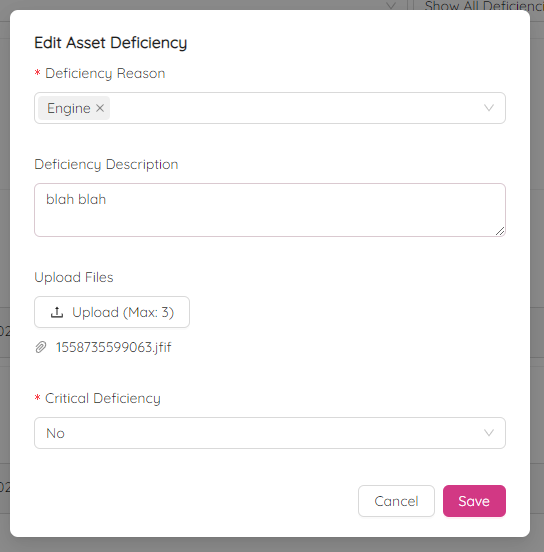
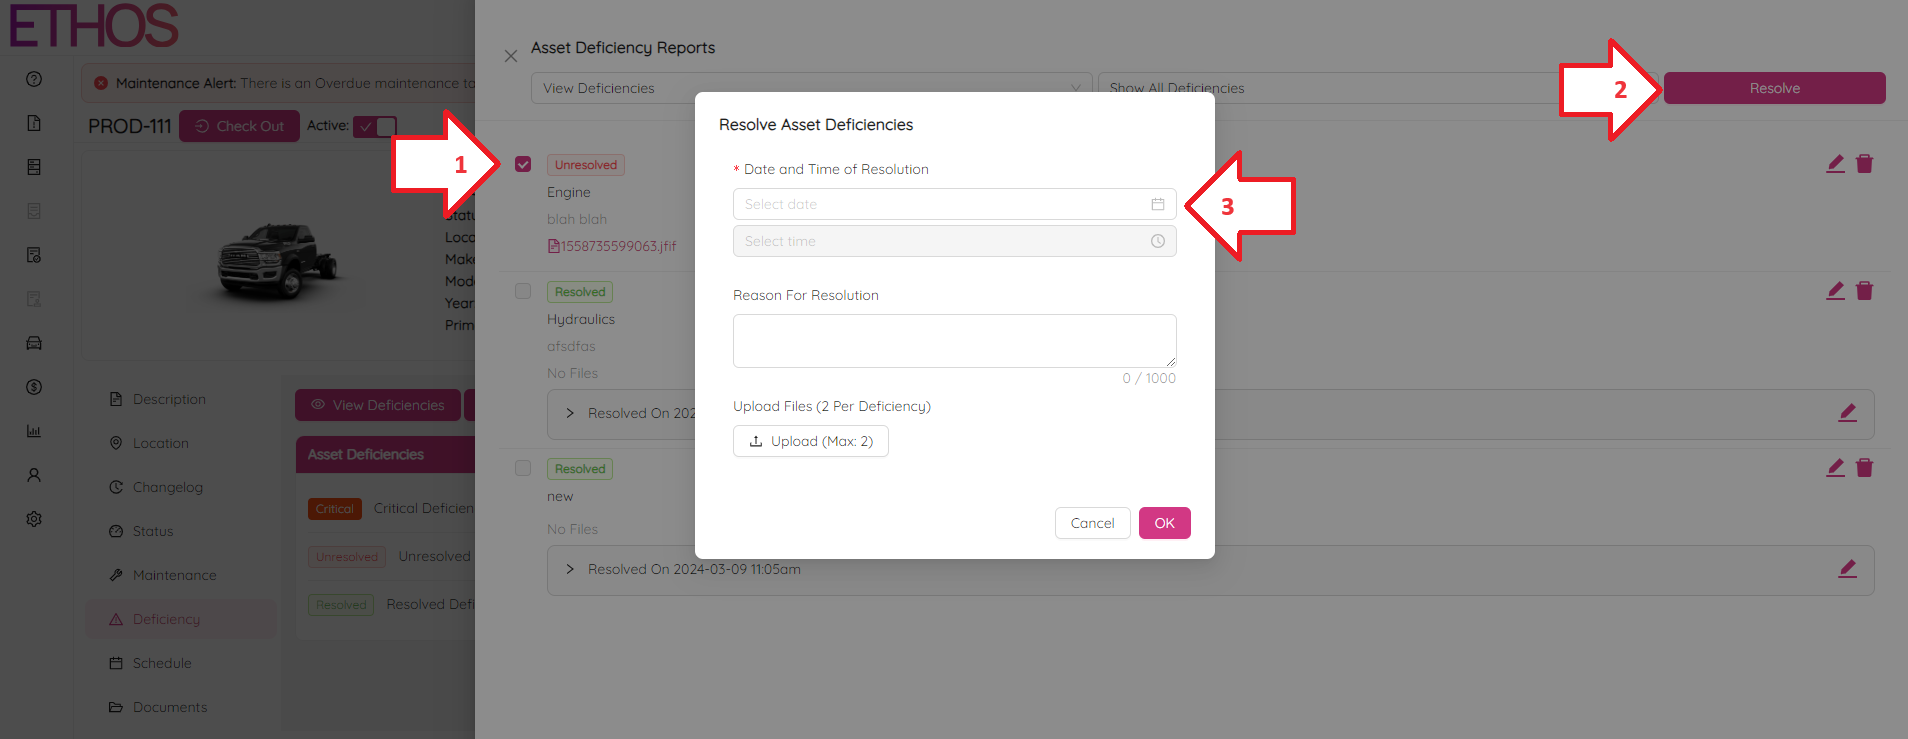
An asset deficiency can be resolved either manually or as part of a maintenance (see Asset Maintenance). To resolve manually any unresolved deficiency, tick the deficiency record and then the Resolve button at the top right. Fill in the date, time, optional reason and supporting files.
Additionally, you can filter the list by critical, unresolved, or resolved deficiencies to quickly find the information you need.
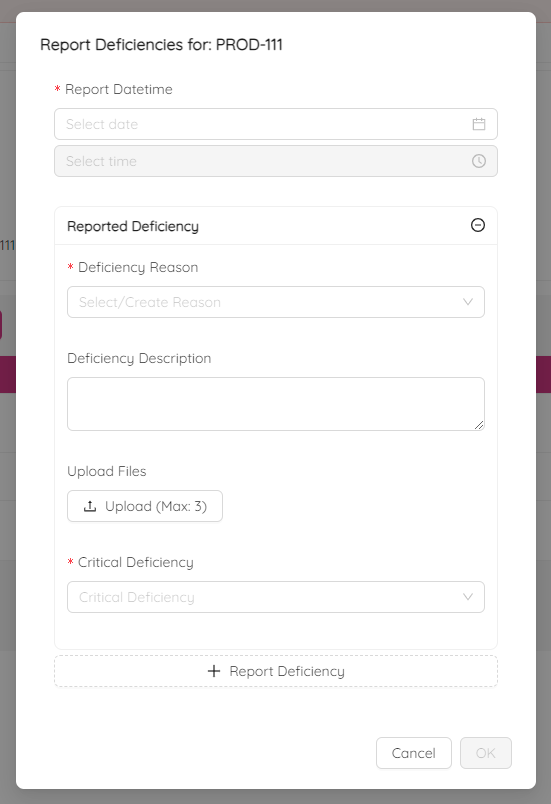
To report a new deficiency, simply click on the + Create Deficiency Report button. From there, specify the date and time of the deficiency, the reason for the deficiency, a short description, and upload files such as photos (up to 3). You can select from a list of predefined reasons, or enter a new reason in the field provided if none of the verified reasons fit the current deficiency. It's also important to indicate whether the deficiency is critical, which means it prevents the asset from being used. Flagging this field as Yes will also disable the checkout option for the asset until the deficiency is resolved. This helps prioritize the resolution of the deficiency and avoid any potential safety hazards.
Schedule
The Schedule section is available allows you to view a schedule of asset requests and assigned assets.
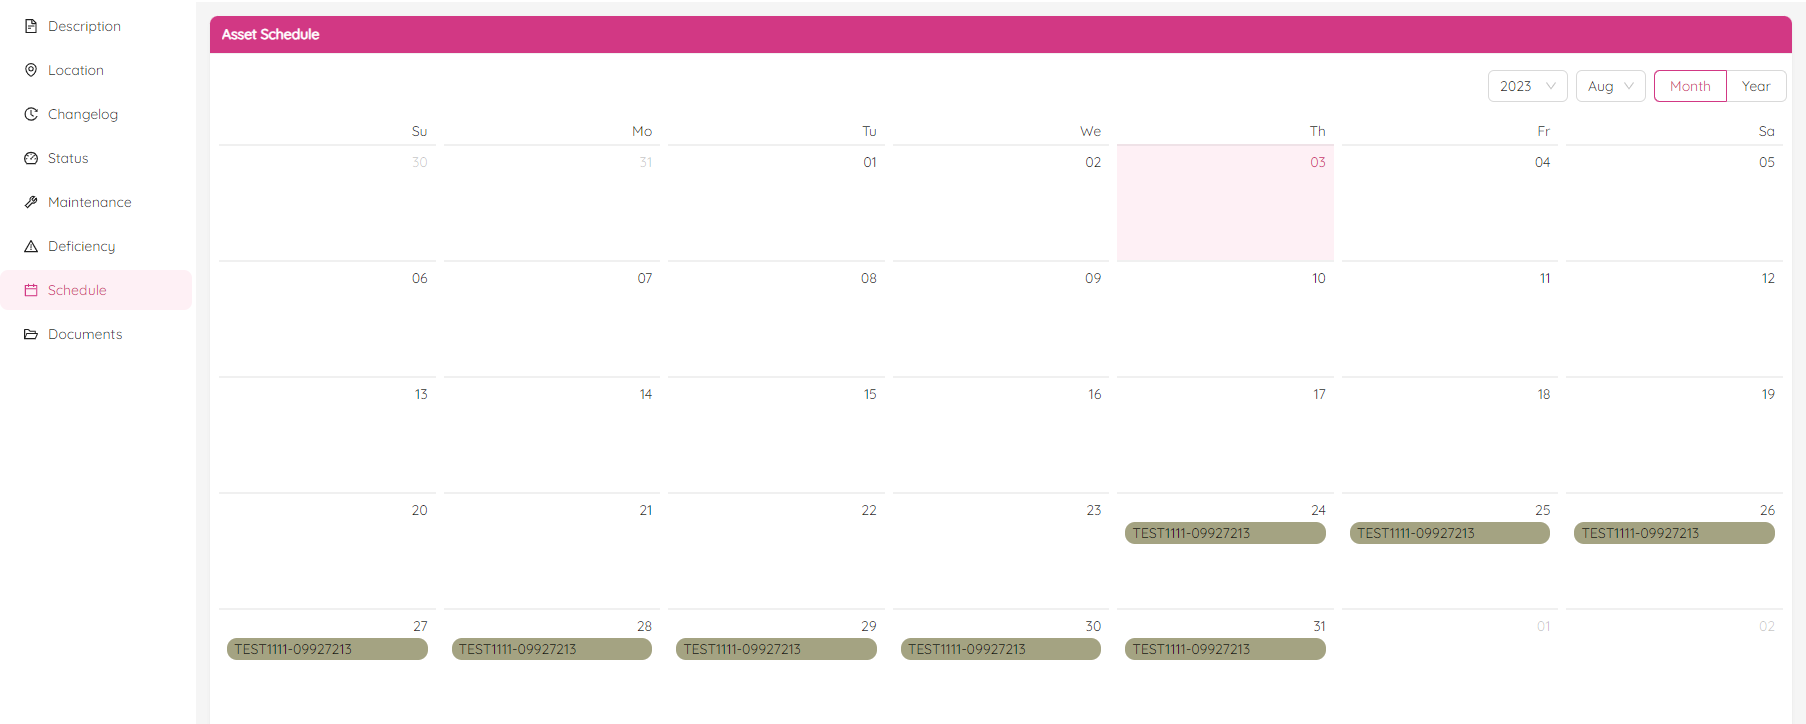
Choose the specific year and month for which you would like to see the schedule. The calendar will display project numbers and request numbers codes for the dates on which this asset has been requested. More than one request number can be reflected on the same days if the asset is assigned to fulfill multiple requests for the same period.
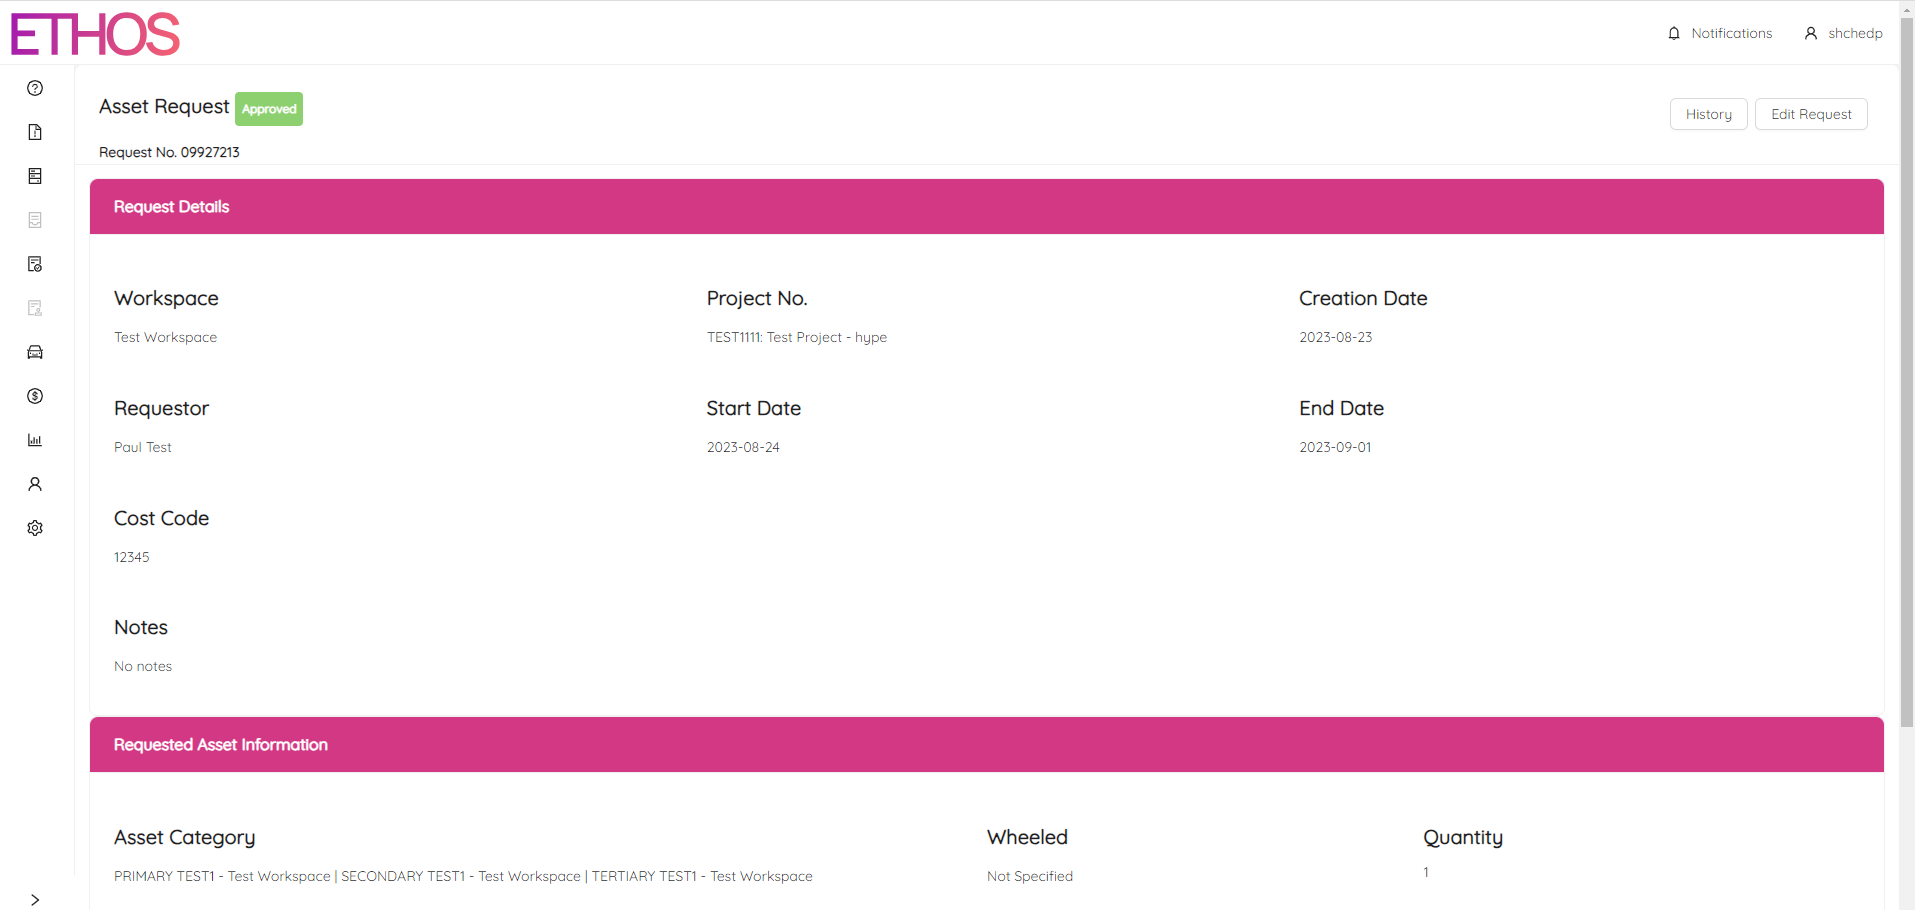
Clicking on the request number will lead you to the request single view page where you can view it's history and make changes.
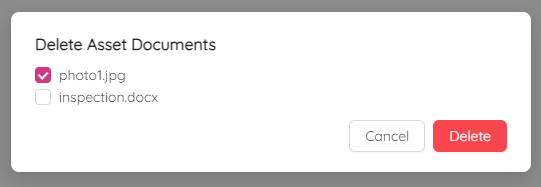
Documents
This section is to upload and delete asset documents such as operation and maintenance manuals, inspection forms and others.
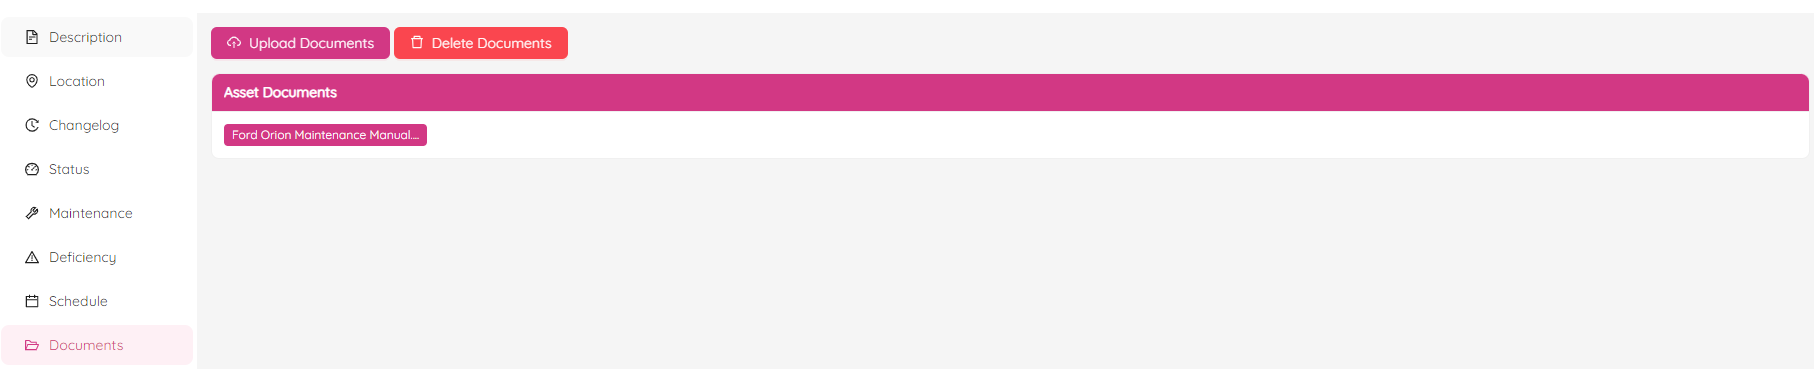
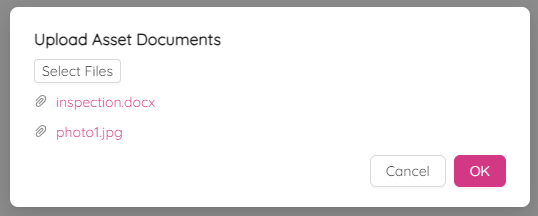
Click on the Upload Documents button to select and upload one or multiple files.
By clicking on the Delete Documents button, you can delete any unnecessary document.